Solution Copyright © 2000 by Mike Marcelais.
General Notes
Everything in here is based on information from the version of Wizardry III that was included with the Wizardry Archives for the PC. Other versions of Wizardry III (including earlier PC releases) may differ.
Unlike the previous two Wizardrys, there are some significant puzzles in this one. However, the game is still primarily about mapping out each level, finding equipment, and gathering experience points. Experience seems much harder to get than in previous Wizardrys, and treasure is trickier to get as it seems a thief is wrong more often than not, even at high levels, making opening chests dangerous through the entire game.
Unlike in other games, teleporter squares also teleport light. Thus, if you're standing just south of a teleporter square, when you look north, you see the corridor that you would be teleported into. That, along with the lack of a visual cue when you've been teleported (like the screen flash in Bard's Tale) can sometimes make it hard to tell when you've been teleported.
You cannot create new characters in Wizardry III, you must transfer them in from Wizardry I or II. Also, you do not get to keep your equipment, gold, levels, experience, or spells. Your ninja that had formerly been both a priest and mage, and hence, knew all of the spells will come over as just a plain ninja. Your party makeup at the end of Wizardry II may not be suitable at 1st level without any of their previous class' spells.
When I played Wizardry III, I reverted back to the standard 2 Fighters, 2 Mages, a Thief, and a Priest. Everyone except the priest was neutral (for reason that will become obvious later). Don't make a Lord or a Ninja as they can't switch alignments -- a necessity in this game.
Make a bishop. Keep him at home. (You'll have to create him in Wizardry I and transfer him over.) Whenever you return to town, give your unknown items to this Bishop, have him identify everything, and then give it back. If the item turns out to be cursed; well, you didn't want it anyway. If your Bishop collects too many cursed items, just delete him and make a new one.
Many doors in the game are hidden, revealed only when casting lomilwa or its little brother milwa. You should have that spell going during your entire expedition. Doors on the maps below are not marked as being hidden or not. Note that you can go through a hidden door even if you can't see it.
A few doors are still invisible even when you have a lomilwa going. These doors are not marked differently on the maps below. Some one-way doors appear as "open space" from the direction that you can walk through them. They are not marked differently either.
Maps and Solutions
↑ Back to TopGeneral Solution: First, make a good aligned party. Head through level 2 to get to level 4. On level 4 defeat Delf to get the Crystal of Evil. Go to the chute, get the message about Abdul, and drop back down to level 2.
On level 2, collect the Amulet of Air and the Staff of Earth. Return to level 4.
Hang out on level 4 until you get a Ship in a Bottle. This will let you use the island on level 1 to access levels 4 and 5 later in the game.
Return to level 1 and attacking monsters (choosing "Fight") until your party turns evil.
Back in town, buy a broadsword. Head to level 3, trade the broadsword for the Gold Medallion, and trade the Medallion for the Holy Water. Then head to the stairs up to level 5. Get the Crystal of Good and the Rod of Fire. Give the two Crystals to one of your evil characters and invoke the Crystal of Evil.
Head up to level 6, go get the Orb of Earithin, return to town, and give the Orb to the Elders.
For all maps, this key is used: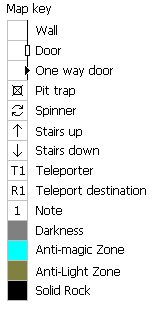
An "anti-light zone" is one that constantly dispells any milwa and lomilwa spells that your party has cast.
Due to a bug, once you enter an anti-magic area, you carry that anti-magic area around with you until you leave the level, no matter where on the level you go. Fortunately, it affects all monsters you encounter as well. Anti-magic areas do not dispel any expidition spells you have already cast.
Level I
- "Barracks"
- "Beware of the Moat Monsters"
- Fixed encounter (when entering this room from any direction): High Corsair, 4 or 5 Garian Captains
- The message here gives you the big hint that a single good or evil party cannot win the game.
- Stairs lead up to (19E,0N) on level 2.
- Stairs lead up to (2E,2N) on level 3.
- Teleporter to town.
- You are standing on a beach with an island in the distance.
- Water's edge. If you have the Ship in a Bottle (which is found in random encounters only on levels 4 through 6), then you can travel over the water without problem.
- You fall into the water and drown unless you have the Ship in a Bottle.
- Stairs lead up to (7E,1N) on level 4.
- Stairs lead up to (18E,0N) on level 5.
Note that levels go up in Wizardry III, not down as in previous games.
The first major puzzle of the game stars right here in getting off this level. If your party is "good" (more good characters than evil) the stairs to level 2 will work. If your party is "evil" (more evil characters than good), then the stairs to level 3 will work. If you have the same number of good and evil party members (including having an entirely neutral party), both stairways will work. Eventually you will need to visit both levels. (See the notes at level 2 for more details.)
You can change alignment by how you react to monsters. Every time you are offered the "Fight or Leave?" choice, choosing "Fight" has a chance of turning a good character evil; and choosing "Leave" has a chance of turning an evil character good.
Note that if you return to town with a mixed good and evil party, the party members of the new alignment will scatter from your party (usually taking their gold and items with them) and you cannot rejoin them to your party.
Note that because of the need to be both alignments, ninjas and lords are at a real disadvantage. The easiest way through this is to have your entire party, except for one priest, be neutral. You only have to worry about changing a single character's alignment then.
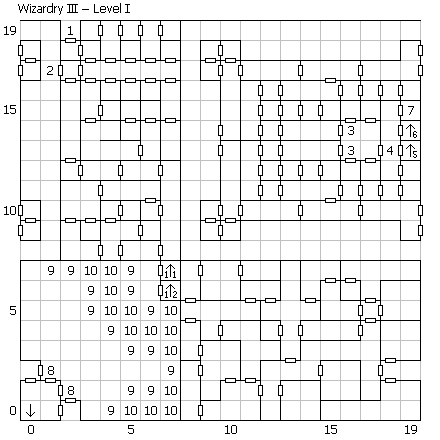
Level II
- The answer to the riddle here is "Air". Getting the answer wrong pushes you backwards one square.
- Stairs here lead up to (10E,2N) on level 4.
- The password here is "Abdul sent you". (Not "Abdul sent me", as you might think from the clue given to you on level four.)
- Entrance to the Wizard Po'le's offices. The wizard is out.
- If you search the large oak desk, you can find the Staff of Earth.
- Stairs here lead up to (13E,13N) on level 4.
- Dining room of Po'le.
- Wine Celler.
- Fixed encounter: 2 Po'le. You get the Amulet of Air when you win.
This level is "good". This means that if you ever have more evil characters in your party than good characters, your entire party will be teleported back to town. This happens regardless of how you arrive at this level (malor, walking up or down stairs, and so on.).
You can only access half the level when you first arrive here. The other half of the level can only be accessed from a chute on level 4.
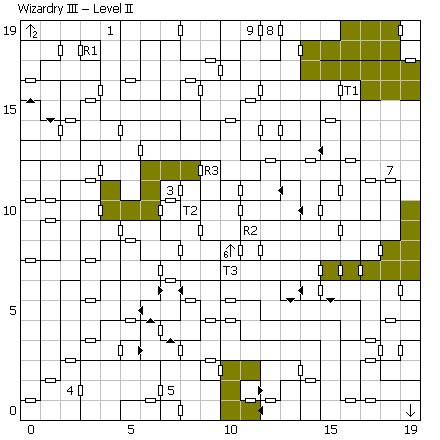
Level III
- "I'd turn back if I were you."
- "Have you considered another direction?"
- A monk here will offer to exchange your soul for this chest. What he really wants is a broadsword. A regular old broadsword. If anyone in the party has one, then searching here will trade that broadsword for a Gold Medallion.
- The apparition in the murky pool will trade a Gold Medallion for Holy Water.
- "A graveyard's dark..."
- "And this traps' a crock..."
- "Don't go any further, or..."
- "You are in rock." Yes, you can walk right into this solid rock square, and it will kill your entire party.
- Abdul's Ethereal Taxi Service. For 2,500gp, it will teleport you back to town.
- If you do not have Holy Water, then this will teleport you back to the stairs down (2,2).
- Stairs here lead up to (11E,0N) on level 5.
This level is "evil". This means that if you ever have more evil characters in your party than good characters, your entire party will be teleported back to town. This happens regardless of how you arrive at this level (malor, walking up or down stairs, and so on.).
The mass of one-way doors in the middle of this level are actually invisible from the side that you can walk through, rather than appearing as doors. Hence, it looks like the room is closing off as you walk across it.
Level IV
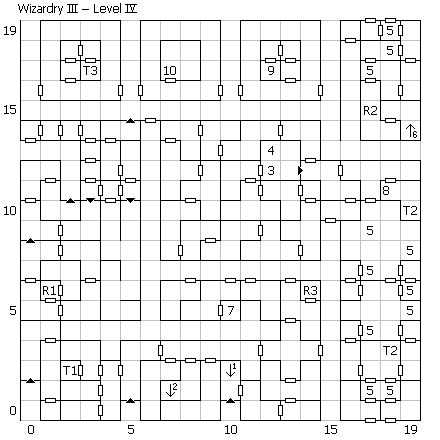
- Stairs down to (0E,19N) on level 2.
- Stairs down to (7E,7N) on level 1.
- Someone tells you, "Tell them 'Abdul sent you'". This is the password for level 2. And the password really is "Abdul sent you"; don't turn it around to read "Abdul sent me".
- Chute down to (5E,0N) on level 2.
- "Look out!" Stepping on one of these squares triggers a random encounter in the next square you step to.
- Stairs up to (5E,0N) on level 6. If you don't have the Crystal of Evil, you will be teleported back to town instead.
- A black liquid here will paralyze anyone that wades in it.
- The answer to the riddle here is "fire". You don't need to answer it, except you can use the teleporter beyond the riddle to avoid the "Look out" squares.
- Fixed encounter: Two groups of Delf's Minions.
- Fixed encounter: Delf and two groups of Delf's Minions. You get the Crystal of Evil when you win.
This level is "good". This means that if you ever have more evil characters in your party than good characters, your entire party will be teleported back to town. This happens regardless of how you arrive at this level (malor, walking up or down stairs, and so on.).
Level V
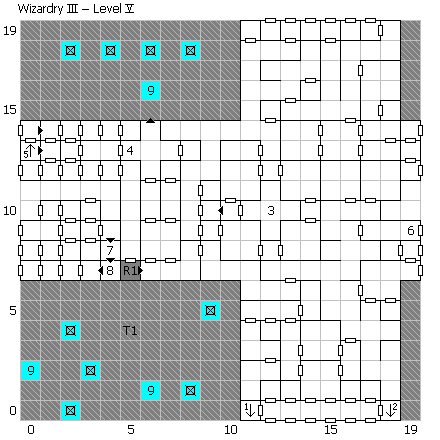
- Stairs down to (0E,1N) on level 3.
- Stairs down to (7E,6N) on level 1.
- Fixed encounter: Soul Trappers, Crusader Lords, and two groups of Crusaders. You get the Crystal of Good when you win.
- The answer to the riddle here is "Chariot". The "deck of 78" is refering to the tarot deck.
- Stairs up to (14E,0N) on level 6.
- Temple of Fung entrance.
- Abdul offers to sell you the Rod of Fire for 25,000gp.
- Collect the Rod of Fire here if you paid for it.
- Abdul's Ethereal Taxi Service. Will take you back to town for 5,000gp.
This level is "evil". This means that if you ever have more evil characters in your party than good characters, your entire party will be teleported back to town. This happens regardless of how you arrive at this level (malor, walking up or down stairs, and so on.).
The two-colored shaded area is both anti-magic and darkness.
Level VI
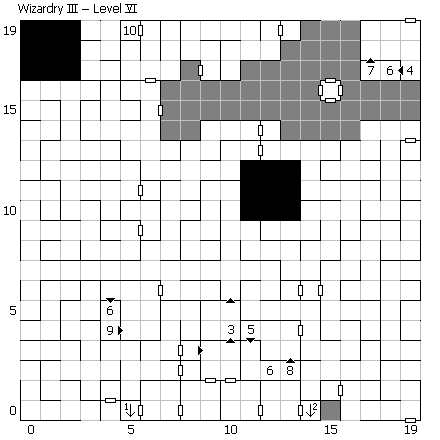
- Stairs down to (19E,14N) on level 4.
- Stairs down to (0E,13N) on level 5.
- Fixed encounter: L'Kbreth. If you have the Neutral Crystal, he welcomes you inside. If you don't, you end up fighting him. None of your spells work and your attacks always miss. You can flee, and this will take you back to the square you entered this level from (on either level 4 or 5).
- The answer to the riddle here is "Death".
- The answer to the riddle here is "Wheel".
- You see a statue with a shining orb.
- If you search the statue, the person with the Neutral Crystal will trade it for the Orb of Earithin.
- If you search the statue, the person with the Neutral Crystal will trade it for the Orb of Mhuuzfes.
- If you search the statue, the party is attacked by Xenos.
- Teleporter to (0,0) on level 1.
Dumapic does not work on this level. Malor can be used to teleport out of this level, but not onto it. Locations in the above were found by casting malor to go directly down to level 1, followed by a dumapic to give me my current position.
If you don't have one of the three crystals (Good, Evil, Neutral), then you will be sent back to town upon entering this level.
When you get to this level (or even before), you want to make the Neutral Crystal. Do this by giving both the Good and Evil Crystals to one of your non-neutral party members. Then invoke the Crystal that is the same alingment as your party member.
If you invoke the wrong crystal, your character turns to ash. If a neutral character invokes a crystal, or you only have one of the two crystals when you invoke it, then the crystals merely vanish.
When you return to town with the Orb of Earitian, you have the option of giving it to the Elders. If you do, you get the mark of victory and a sizable chunk of experience points. (If you don't, you get to keep the Orb. You'll be asked everytime you return to town with it whether you want to give it up or not.)
Returning the Orb of Mhuuzfes gets you nothing.
Class Information
↑ Back to TopThis is information that I think should be in the manual, but isn't.
Bonus points required to be eligible for a class:
| Fi | Ma | Pr | Th | Bi | Sa | Lo | Ni | |
|---|---|---|---|---|---|---|---|---|
| Humans | 3 | 3 | 6 | 3 | 11 | 23 | 37 | 56 |
| Elves | 4 | 1 | 1 | 2 | 4 | 18 | 35 | 54 |
| Dwarves | 1 | 4 | 1 | 6 | 7 | 18 | 35 | 54 |
| Gnomes | 4 | 4 | 1 | 1 | 7 | 18 | 34 | 53 |
| Hobbits | 6 | 4 | 4 | 1 | 10 | 25 | 33 | 52 |
Experience points and spell progressions.
| Level | Fighter | Mage | Priest | Thief | Bishop | Samurai | Lord | Ninja |
|---|---|---|---|---|---|---|---|---|
| 2 | 1,000 | 1,100 | 1,050 | 900 | 1,000 | 1,250 | 1,300 | 1,450 |
| 3 | 1,724 | 1,896 | 1,810 | 1,551 | 2,105 | 2,192 | 2,280 | 2,543 |
| 4 | 2,972 | 3,268 | 3,120 | 2,674 | 3,692 | 3,845 | 4,000 | 4,461 |
| 5 | 5,124 | 5,634 | 5,379 | 4,610 | 6,477 | 6,745 | 7,017 | 7,826 |
| 6 | 8,834 | 9,713 | 9,274 | 7,948 | 11,363 | 11,833 | 12,310 | 13,729 |
| 7 | 15,231 | 16,746 | 15,989 | 13,703 | 19,935 | 20,759 | 21,596 | 24,085 |
| 8 | 26,260 | 28,872 | 27,567 | 23,625 | 34,973 | 36,419 | 37,887 | 42,254 |
| 9 | 45,275 | 49,779 | 47,529 | 40,732 | 61,136 | 63,892 | 66,468 | 74,129 |
| 10 | 78,060 | 85,825 | 81,946 | 70,187 | 107,642 | 112,091 | 116,610 | 130,050 |
| 11 | 134,586 | 147,974 | 141,286 | 121,081 | 188,845 | 196,650 | 204,578 | 228,157 |
| 12 | 232,044 | 255,127 | 243,596 | 208,750 | 331,370 | 345,000 | 358,908 | 400,275 |
| 13 | 400,075 | 439,874 | 419,993 | 359,931 | 581,240 | 605,263 | 629,663 | 702,236 |
| ++ | 289,709 | 318,529 | 304,132 | 260,639 | 438,479 | 456,601 | 475,008 | 529,756 |
| Spells | None | M 1-2 | P 1-2 | None | 1-4/4-4 | M 4-3 | P 4-3 | None |
++ refers to how many additional experience points are required for each level after 13th.
Spells are listed as two numbers: the level at which you gain 1st level spells, and the number of additional levels you need to gain to get another spell level. For example Mages are listed as 1-2, so they get 1st level spells at 1st level, and new spell level every other level (3rd, 5th, etc).
The number of spells you can cast each level is equal to the number of levels you have been able to cast that level of spell at. For example, a 7th level mage got access to 3rd level spells at 5th level. He will therefore have 3 3rd level spell slots (5th, 6th, and 7th levels.) You will always have one spell slot for each spell you know, and you cannot have more than nine slots in each level.
Note that Bishops start Wizardry III knowing both 1st level priest and mage spells. They don't gain any priest spell slots though until 4th level (except for the minimum of one slot per spell), nor do they gain any 2nd level spells until 8th level, like you'd expect for a 4-4 spell progression.
Item List
↑ Back to TopItem: The name of the item, as it appears in the game.
Classes: Which classes can equip, invoke, or use the item.
Align/Cursed: If an alignment is listed here, then the item becomes cursed if you equip the item and are of a different alignment. Generally, this makes the items' powers nonfunctional and reduces your AC and "to hit" rolls by 2 each. Items marked "cursed" are always cursed and cannot be unequipped.
Price: This is the price that you can buy the item for. The selling, uncursing, and identification price are half this amount (rounding down). Items with a price of "*" cannot be sold, nor purchased. They cost 150,000 to identify and uncurse.
AC: The amount this changes your AC. Lower numbers are better.
Damage: The amount of damage this weapon does.
TH: The bonus on your ability "to hit" monsters.
Speed: A higher speed allows you to attack sooner in combat, and to get more melee attacks with your weapon in a single round.
Special: Other powers that the item has. Regeneration gives you that many hit points back each round of combat. Items marked "Use:" or "Invoke:" have a power that is activated when you use it or invoke it. If the power has a percentage listed after it, this is the chance that the item will be consumed when used. If no percentage is listed, then the item can be used exactly once. Most items just "disappear" when they are consumed. A few items become some other type of item. This is listed below as "becomes ~".
Information in this table was taken from the internal data tables on the Wizardry disk, and checked (when possible) against actual gameplay.
| Item | Classes | Align/ Cursed | Price | AC | Damage | TH | Speed | Special |
|---|---|---|---|---|---|---|---|---|
| Battle Axe-1 | F S N | Cursed | 1,000 | 1d4 | +3 | -2 | ||
| Hand Axe | F T S N | 30 | 1d4 | +3 | ||||
| Battle Axe | F S N | 140 | 1d6+2 | +4 | ||||
| Battle Axe+1 | F S N | 12,500 | 1d8+2 | +5 | +1 | |||
| Unholy Axe | F S N | Evil | 22,500 | 1d10+2 | +5 | +2 | ??? | |
| Battle Axe+2 | F S N | 20,000 | 2d5+2 | +5 | +2 | |||
| Broadsword-1 | F SLN | Cursed | 1,000 | 1d4 | +3 | -1 | ||
| Broadsword | F SLN | 50 | 1d8 | +4 | ||||
| Broadsword+1 | F SLN | 10,000 | 1d10 | +5 | +1 | |||
| Flametounge | F SL | 15,000 | 1d10+1 | +5 | +1 | Resist fire, Use: Cast Halito (0%) | ||
| Broadsword+2 | F SLN | 20,000 | 2d6 | +6 | +2 | |||
| Blade Cuisinart' | F SLN | 15,000 | 1d3+9 | +4 | +5 | |||
| Short Sword-1 | F T SLN | Cursed | 1,000 | 1d3 | +2 | -1 | ||
| Short Sword | F T SLN | 30 | 1d6 | +3 | ||||
| Short Sword+1 | F T SLN | 10,000 | 1d8 | +4 | +1 | |||
| Short Sword+2 | F T SLN | 20,000 | 2d5 | +5 | +2 | |||
| Mace-1 | F P BSLN | Cursed | 1,000 | 1d3 | +1 | -1 | ||
| Margaux's Flail | F P SLN | Cursed | 1,000 | 1d3 | +2 | -2 | ||
| Mace | F P BSLN | 60 | 2d3 | +2 | ||||
| Flail | F P SLN | 300 | 1d7 | +3 | ||||
| Shepherd Crook | P B L | Good | 22,500 | 2d4 | +2 | +1 | ??? | |
| Mace+1 | F P BSLN | 10,000 | 2d4+1 | +3 | +1 | |||
| Nunchaka | F P S N | 15,000 | 1d10 | +4 | ||||
| Mace+2 | F P BSLN | 20,000 | 2d5 | +4 | +2 | |||
| Giant's Club | F P SLN | Cursed | 20,000 | 2d5+2 | +4 | +2 | vs giants | |
| Dagger-1 | FM T SLN | Cursed | 1,000 | +1 | 1d3 | -1 | ||
| Dagger | FM T SLN | 10 | +1 | 1d4 | +1 | |||
| Dagger+1 | FM T SLN | 10,000 | +1 | 1d6 | +2 | +1 | ||
| Ivory Blade (G) | FM T SL | Good | 15,000 | 1d8 | +3 | +2 | ||
| Amber Blade (N) | FM T | Neutral | 15,000 | 1d8 | +3 | +2 | ||
| Ebony Blade (E) | FM T S N | Evil | 15,000 | 1d8 | +3 | +2 | ||
| Butterfly Knife1 |
N
| Cursed | 150,000 | 2d10+15 | +6 | +4 | ??? | |
| Butterfly Knife2 | TB N | Cursed | 500,000 | Invoke: Become Ninja and become Butterfly Knife1 | ||||
| Staff | FMPTBSLN | 20 | 1d4 | |||||
| Wizard's Staff | M BS | 6,000 | 2d4 | +1 | +1 | Use: Cast Mogref (0%) | ||
| Round Shield-1 | F PTBSLN | Cursed | 2,000 | +1 | -1 | |||
| Round Shield | F PTBSLN | 40 | -1 | |||||
| Heater Shield | F P SLN | 80 | -2 | |||||
| Heater+1 | F P SLN | 2,500 | -3 | |||||
| Heater+2 | F P SLN | 6,000 | -4 | |||||
| Wargen Robes | FMPTBSLN | Cursed | 2,000 | +1 | ||||
| Mage's Robes | FMPTBSLN | 30 | -1 | |||||
| Displacer Robes | FMPTBSLN | 12,000 | -3 | |||||
| Cuirass-1 | F PTBSLN | Cursed | 2,000 | -1 | -1 | |||
| Cuirass | F PTBSLN | 100 | -2 | |||||
| Cuirass+1 | F PTBSLN | 3,000 | -3 | |||||
| Cuirass+2 | F PTBSLN | 6,000 | -4 | |||||
| Hauberk-1 | F P SLN | Cursed | 2,000 | -2 | -1 | |||
| Hauberk | F P BSLN | 200 | -3 | |||||
| Hauberk+1 | F P BSLN | 3,500 | -4 | |||||
| Hauberk+2 | F P BSLN | 8,000 | -5 | |||||
| Breastplate-1 | F P SLN | Cursed | 2,000 | -3 | -1 | |||
| Breastplate | F P BSLN | 400 | -4 | |||||
| Breastplate+1 | F P BSLN | 4,000 | -5 | |||||
| Breastplate+2 | F P BSLN | 10,000 | -6 | |||||
| Plate Armor-1 | F SLN | Cursed | 2,000 | -4 | -1 | |||
| Plate Armor | F SLN | 1,500 | -5 | |||||
| Plate Armor+1 | F SLN | 5,000 | -6 | |||||
| Plate Armor+2 | F SLN | 14,000 | -7 | |||||
| Sallet-1 | F SL | Cursed | 2,000 | +0 | -1 | |||
| Sallet | F SL | 200 | -1 | |||||
| Bascinet | F SL | 1,000 | -2 | |||||
| Armet | F SL | 8,000 | -3 | |||||
| Gloves of Iron | F P SL | 2,500 | -1 | |||||
| Gloves of Mithril | F T SL | 6,000 | -2 | |||||
| Mantis Gloves | F P SL | 15,000 | -3 | +1 | ??? | |||
| P of Latumofis | FMPTBSLN | 600 | Use: Cast Latumofis (85%) | |||||
| P of Dios | FMPTBSLN | 1,000 | Use: Cast Dios (95%) | |||||
| P of Sopic | FMPTBSLN | 2,500 | Use: Cast Sopic (80%) | |||||
| S of Badios | FMPTBSLN | 1,000 | Use: Cast Badios (75%) | |||||
| S of Halito | FMPTBSLN | 1,000 | Use: Cast Halito (95%) | |||||
| S of Katino | FMPTBSLN | 1,000 | Use: Cast Katino (95%) | |||||
| Bag of Gems | FMPTBSLN | 100 | ||||||
| Amulet of Dailko | FMPTBSLN | 8,000 | Use: Cast Dialko (25%) | |||||
| Blue Pearl | FMPTBSLN | 8,000 | +1 | +1 | ??? | |||
| Gold Ring | FMPTBSLN | 10,000 | ||||||
| Bag of Emeralds | FMPTBSLN | Cursed | 10,000 | Invoke: -1 Strength and become Bag of Gems | ||||
| Rabbit's Foot | FMPTBSLN | 10,000 | Invoke: +1 Luck (50%) | |||||
| Thief's Pick | T N | 10,000 | Improve trap checking, Invoke: +1 Agility (50%) | |||||
| Gem of Exorcism | FMPTBSLN | Cursed | 12,000 | ??? | ||||
| Salamander Ring | FMPTBSLN | 15,000 | Resist Fire | |||||
| Serpent's Tooth | MPTB | 15,000 | -1 | |||||
| Ruby Slippers | FMPTBSLN | 16,000 | Use: Cast Loktofeit (75%) | |||||
| Rod of Death | FMPTBSLN | 17,500 | Use: Cast Makatino (50%) | |||||
| Necrology Rod | FMPTBSLN | 20,000 | Gem of Exorcism power, Use: Cast Kandi (5%) | |||||
| Bag of Garnets | FMPTBSLN | 20,000 | Invoke: Age one year and become Bag of Gems (5%) | |||||
| Staff of Earth | FMPTBSLN | 25,000 | Use: Cast Manifo (5%), resist petrification/paralysis | |||||
| Amulet of Air | FMPTBSLN | 25,000 | Use: Cast Dalto (5%), resist cold | |||||
| Holy Water | FMPTBSLN | 25,000 | Use: Cast Dial (5%), resist undead | |||||
| Rod of Fire | FMPTBSLN | 25,000 | Use: Cast Mahalito (5%), resist fire | |||||
| Dragon's Tooth | FMPTBSLN | 30,000 | -2 | |||||
| Trollkin Ring | FMPTBSLN | 40,000 | Regen +1 | |||||
| Book of Life | FMPTBSLN | 50,000 | Use: Cast Di (33%) | |||||
| Book of Death | FMPTBSLN | 50,000 | Use: Cast Mabadi (33%) | |||||
| Book of Demons | MP BSLN | 100,000 | +1 | ???, Use: Cast Zilwan (75%), Invoke: -1 Piety (75%) | ||||
| Gold Tiara | FMPTBSLN | 100,000 | -2 | ??? | ||||
| Gold Medallion |
| ** | Quest Item | |||||
| Orb of Mhuuzfes | FMPTBSLN | Cursed | ** | +10 | Regen -1, Invoke: -1 Piety (0%) | |||
| Ship in Bottle | FMPTBSLN | ** | Pass over water. | |||||
| Crystal of Good | FMPTBSLN | ** | Invoke: See solution (level 6). | |||||
| Crystal of Evil | FMPTBSLN | ** | ||||||
| Neutral Crystal | FMPTBSLN | ** | ||||||
| Orb of Earthin | FMPTBSLN | ** | Quest Item, Invoke: Scry (0%) |
Acknowledgement
Annotated by Mike Marcelais for the RPG Gamers archive.