Solution Copyright © 2000 by Mike Marcelais.
General Notes
Everything in here is based on information from the version of Wizardry IV that was included with the Wizardry Archives for the PC. Other versions of Wizardry III (including earlier PC releases) may differ.
Wizardry IV is fundamentally different from other games in the Wizardry line, and fairly different from most other RPGs. You play Werdna, the evil magician who was defeated in Wizardry I. Throught the entire game, you still play like the enemy, meaning that you generally follow the rules the engine creates for the monsters, rather than ones for the players.
Your party is the minions that you summon at various pentagrams in the dungeon. At the end of every battle, those that aren't killed are treated as fully healed. Those that are dead, are dead. If you need more minions, you can just recharge at one of the pentragrams.
The pentragrams are also the only way your character has to gain levels. There is no experience points in Wizardry IV. You start out the game as level 0, with 8s in all your statistics, 1hp and with no spellcasting ability. Everytime you reach a new pentagram, you gain 1 level, gain 1 to all of your stats, have hp equal to ten times your level, and can cast 9 spell in each spell level up through your character level. Visiting a pentagram also restores your current hp to max and recharges all your spell slots.
Because of this, the right way to finish Wizardry IV is quickly. In a traditional RPG, things get easier the slower you take it: you have more encounters, gain more experience, get better items, and so on, while the game basically stays the same. As such, loitering about makes your life easy.
In Wizardry IV, there is no benefit to hanging out on a level for extended periods of time: you don't get any tougher, you generally won't get better equipment (as all of the good stuff is found in fixed encounters) and the parties out looking for you will just grind you down. Instead you want to move as fast as possible so you can level up at the next pentagram.
Encounters are dealt with uniquely in this game as well. On each level, there are 28 different "players" out hunting for you. This includes 12 players that are part of one of two adventuring parties (although you can encounter those players individually, and you will occassionally encounter a group of 2-3 random players). Once a player is killed, he stays dead and you will not encounter him again. The treasure that each player carries is also fixed; although if the group you're fighting has more than eight items total, you get a random choice of eight of their items. Items appear in the looting list in random order, so there is no way of knowing which of the two potions they have is the potion of Dios without picking them both up or guessing.
Because groups, as a whole, have so many items, and it is rare to encounter members of a group individually, items usually aren't listed for groups. Often a group will have a unique item, which will be listed with the leader of that group, as I have never seen a group's leader, or their unique item, appear without the rest of the group.
If a group has a unique item, then that will always appear in the loot list, regardless of the size of the group. Items in the loot list appear by description only. Only when you put them into your inventory do they get identified. You can't discard items (or use the Black Box) while looting, so always keep enough inventory slots available: At least two, and preferably four, through the entire game.
Speaking of which, Thieves in Wizardry IV have one key ability that they did not have in the first three: the ability to steal items. If a Thief steals an item from you in combat, that item (and the thief) are gone. If they stole a unique item, you can go back to where you got it and get another. Thieves will never steal equipped items, and once you get the Black Box, you never need to worry about Thieves again.
Be wise about when you save. Saving resets all of the encounters on the level (fixed and wandering). That is the only drawback to saving, but it can be significant. Good times to save are:
- When you enter a new level. (It was just reset anyway.)
- Just before a fixed encounter at the end of the level. (You won't be around on the level much longer anyway.)
- Near a pentagram. (You're by your base of operations.)
Of course, any other time you feel that you need to save and the risk is worth the security, go ahead.
On many levels, its a good idea to hang around the pentagram you find until you encounter both parties of adventurers on the level. When they're dealt with, recharge at the pentagram and continue exploring the level. (Don't save, as that will reset the groups you defeated.) That way, you won't have to deal with them again. Most of the single encounters are fairly easy compared with the parties.
When you're at a pentagram, always try to get a decent number of creatures in each group. (For most groups, get at least 4.) If you are unhappy with the numbers you got, enter camp mode and exit (or walk off the pentagram and back on) and you'll summon a new set. Repeat until you have a large group.
It isn't immediately clear, but when you're at a pentagram, you can summon monsters from any weaker pentagram as well. Just choose "Previous" to scroll the list to the next lower level. Sometimes, one of the best three groups will be found on a weaker level.
Unlike in other games, (but like previous Wizardrys) teleporter squares also teleport light. Thus, if you're standing just south of a teleporter square, when you look north, you see the corridor that you would be teleported into. That, along with the lack of a visual cue when you've been teleported (like the screen flash in Bard's Tale) can sometimes make it hard to tell when you've been teleported.
Because you play a mage, and you don't have a party per se, your access to milwa and lomilwa is extremely limited. Some items can cast those spells for you, as can priests that are in your party. Lomilwa will last forever (even through a Quit and Restart), although it is dispelled by the darkness squares. Unlike in previous Wizardrys, you can't walk through a secret door that you can't see. Because of this, some key secret doors are marked as such on the maps.
There are also a number of "fake" doors throught the game: walls drawn to look like doors. These are simply drawn as walls on the maps.
Maps
↑ Back to TopFor all maps, this key is used: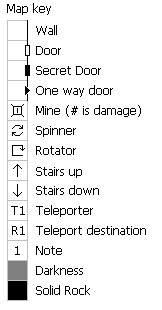
A spinner spins you around in a random direction when you step on it. A rotator spins all of the walls of the square you are in around in the direction indicated when you enter the square. (Camping, or Saving/Reloading will retrigger the rotation). A rotator with a "P" in it rotates the walls when you leave the square. (A "post-rotator").
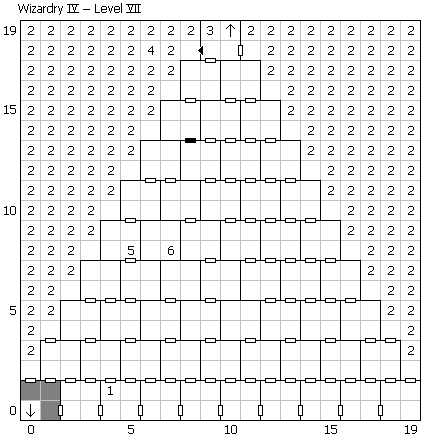
Level X - The Pyramid
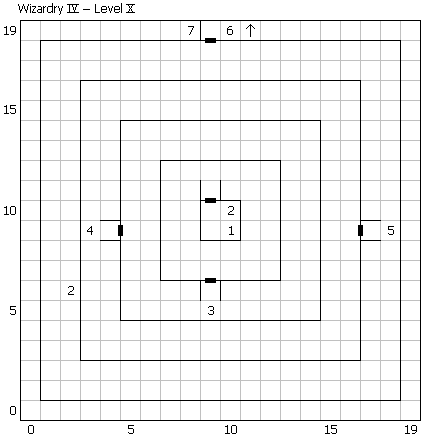
- You start the game here.
- First Pentagram: Dinks, Fuzzball, Creeping Coins, Bubbly Slimes, Orcs,
Level 1 Mages, Gas Clouds, Skeletons, Garian Raiders,
Level 1 Priests, Zombies, Kobolds.
Recommended creatures are Creeping Coins (breath on party), Zombies (paralyzation), and Lvl 1 Priests (healing, milwa).
You need to summon Level 1 Priests in order to see the secret doors that lead to the guardians on this level. - Fixed encounter with First Guardian.
- Fixed encounter with Second Guardian.
- Fixed encounter with Third Guardian.
- Fixed encounter with Fourth Guardian.
- Find the Bloodstone.
| Player | Align | Class | AC | HP | Treasure | |
|---|---|---|---|---|---|---|
| Rendor's Roughnecks | ||||||
| Nightwind | Good | Samurai | 6 | 10 | ||
| Nicat | Neutral | Fighter | 7 | 8 | ||
| Galvin | Neutral | Fighter | 7 | 8 | Longsword, Chain Mail, Helm, P of Dios | |
| Fearless Fred | Neutral | Fighter | 7 | 8 | Longsword, Leather Armor, Large Shield, P of Dios | |
| Aman-Rah | Good | Mage | 9 | 10 | ||
| Rendor | Good | Mage | 9 | 8 | ||
| Jiri's Jaguars | ||||||
| Jiri | Good | Fighter | 7 | 16 | ||
| Balorsk | Neutral | Fighter | 7 | 9 | Longsword, Leather Armor, Large Shield, P of Porfic | |
| Baltec | Neutral | Fighter | 6 | 21 | ||
| Avenger | Good | Priest | 7 | 8 | ||
| Sorceric | Good | Mage | 9 | 5 | ||
| Lyanna | Neutral | Thief | 8 | 6 | Shortsword, Leather Armor, P of Dios | |
| Other Random Encounters | ||||||
| Belgarion | Evil | Fighter | 7 | 8 | Chain Mail, Large Shield, Helm | |
| Mandorallen | Good | Fighter | 7 | 8 | Longsword, Leather Armor, Large Shield, Helm, P of Dios | |
| Bonb | Neutral | Fighter | 7 | 9 | Longsword, Leather Armor, Small Shield, Helm, P of Dios | |
| Blue Sonja | Good | Fighter | 7 | 9 | Longsword, Chain Mail, Small Shield, Helm | |
| Growler | Good | Fighter | 7 | 9 | Leather Armor, Small Shield, Helm, P of Dios | |
| Ironbar | Good | Fighter | 7 | 9 | Leather Armor, Small Shield, Helm, P of Dios | |
| Ricatamak | Good | Fighter | 7 | 9 | Leather Armor, Small Shield, P of Dios | |
| Werty | Neutral | Mage | 9 | 2 | S of Halito, P of Porfic | |
| Mighty Moh | Evil | Mage | 9 | 3 | Staff, Robes, S of Badios, S of Halito | |
| Cauldron Born | Good | Priest | 7 | 7 | Anointed Flail, Leather Armor, Small Shield, P of Dios | |
| Pig-I-Iggy | Good | Priest | 7 | 8 | Anointed Flail, Large Shield, P of Porfic | |
| Animotion | Evil | Thief | 8 | 6 | Shortsword, Leather Armor, Small Shield, P of Dios | |
| Night-Walker | Evil | Thief | 8 | 6 | Leather Armor, Small Shield, S of Katino, P of Dios | |
| Darkforce | Evil | Bishop | 7 | 6 | Anointed Flail, Leather Armor, Small Shield, P of Porfic | |
| Capsin | Good | Bishop | 7 | 20 | Chain Mail, Large Shield, P of Dios, P of Porfic | |
| Rumple | Good | Samurai | 6 | 21 | Longsword, Leather Armor, Large Shield, P of Porfic | |
| First Guardian | ||||||
| Inner Guardian | Good | Fighter | 6 | 20 | Chain Mail, Large Shield, Helm | |
| Second Guardian | ||||||
| Middle Guardian | Good | Fighter | 5 | 30 | Longsword+1, Chain Mail, P of Dios, P of Porfic | |
| Third Guardian | ||||||
| Outer Guardian | Good | Mage | 9 | 40 | Staff, Robes, S of Halito, S of Katino | |
| Fourth Guardian | ||||||
| Pyramid Guard | Good | Samurai | 3 | 50 | Black Candle, Large Shield, Helm+1, Copper Gloves, Jeweled Amulet | |
Level IX - The Catacombs
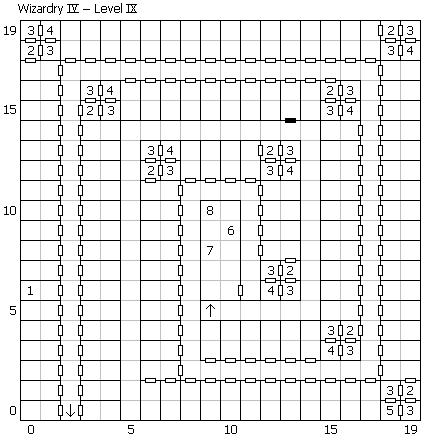
- Pentagram: Creeping Cruds, Crawling Kelps, Mummies, Witches, Poltergeists,
No-See-Um Swarm, Rogues, Ashers, Anacondas, Dusters, Huge Spiders, Lvl 3 Priests.
Recommended creatures: Mummies (paralyzation), No-See-Um (breath on party), Lvl 3 Priests (healing, milwa). - Fixed Encounter with Tower Sentries.
- Fixed Encounter with Tower Guards.
- Fixed Encounter with Officer's Mess.
- Get Lander's Turq.
- If you don't search the statue, you are pushed back one square. If you do search, you have a fixed encounter with Something Cute.
- If you don't search the statue, you are pushed back one square. If you do search, you have a fixed encounter with Slavering Beast.
- The Gates of Hell.
- If you offer money, it melts.
- If you use the Demonic Chimes (bell), the Arabic Diary (book), and the Black Candle, in that order, then the Gates open.
- If you enter the Gates with both the Winged Boots and the Dreampainter's KA, then you get the HHG of Aunty Ock.
- If you don't have both the Boots and the KA, you die. (Different death for all three posibilities.)
| Player | Align | Class | AC | HP | Treasure | |
|---|---|---|---|---|---|---|
| Greyhawk's Ghostbusters | ||||||
| Greyhawk | Neutral | Samurai | 2 | 74 | ||
| Dameon | Evil | Fighter | 4 | 41 | ||
| Falstaff | Neutral | Fighter | 4 | 37 | Longsword+1, Breast Plate, P of Porfic | |
| Kenan | Evil | Bishop | 5 | 26 | Anointed Mace, Chain Mail, Small Shield, P of Dios, P of Porfic | |
| Mystic | Neutral | Mage | 9 | 32 | ||
| Drach | Neutral | Mage | 9 | 21 | ||
| Talon's Tigers | ||||||
| Talon | Good | Lord | 4 | 26 | Cone of Silence | |
| Aragaunt | Good | Fighter | 5 | 31 | ||
| Legolots | Good | Fighter | 5 | 38 | ||
| Borehimhere | Neutral | Fighter | 6 | 29 | Longsword, Large Shield, Helm, P of Dios | |
| Thonolan | Neutral | Thief | 7 | 19 | Shortsword, Leather Armor, P of Dios, P of Porfic | |
| Tarn | Neutral | Mage | 9 | 9 | ||
| Other Random Encounters | ||||||
| Randalf | Neutral | Fighter | 6 | 18 | Chain Mail, Small Shield, Helm, P of Dios | |
| Tyron | Good | Fighter | 6 | 19 | Longsword, Chain Mail, Small Shield, Helm | |
| Full-Strike | Evil | Fighter | 6 | 20 | Longsword, Chain Mail, Helm, P of Dios | |
| Jetstream | Good | Fighter | 5 | 24 | Longsword, Chain Mail, Helm, P of Dios | |
| Luke Apple | Good | Fighter | 5 | 25 | Longsword, Chain Mail, Small Shield, P of Dios | |
| Ice Fighter | Good | Fighter | 5 | 29 | Longsword, Chain Mail, Helm, P of Dios | |
| Makon | Evil | Fighter | 4 | 44 | Longsword, Breast Plate, Large Shield, Helm | |
| Persia | Evil | Mage | 9 | 18 | Staff, Dagger, Robe, P of Porfic | |
| Rastlin | Good | Mage | 9 | 20 | Staff, S of Badios, S of Halito, P of Porfic | |
| Kyoko | Evil | Priest | 6 | 33 | Anointed Mace, Small Shield, P of Porfic | |
| Ozzy | Good | Priest | 5 | 38 | Anointed Mace, Leather Armor, Small Shield, P of Dios | |
| Bones | Neutral | Thief | 6 | 32 | Leather Armor, Small Shield, P of Dios, P of Porfic | |
| Trader | Neutral | Thief | 6 | 36 | Leather Armor, S of Katino, P of Dios, P of Porfic | |
| Alannon | Good | Bishop | 4 | 36 | Anointed Mace, Chain Mail, P of Dios, P of Porfic | |
| Leper | Evil | Bishop | 4 | 36 | Chain Mail, Small Shield, P of Dios, P of Porfic | |
| Brightblade | Good | Samurai | 3 | 57 | Longsword, Breast Plate, Novice Cap, P of Dios, P of Porfic | |
| Tower Sentries | ||||||
| Private | Neutral | Fighter | 5 | 25 | ||
| Private | Neutral | Fighter | 5 | 26 | ||
| Private | Neutral | Fighter | 5 | 28 | ||
| Private | Neutral | Fighter | 5 | 25 | ||
| Private | Neutral | Fighter | 5 | 26 | ||
| Corporal | Neutral | Fighter | 4 | 30 | ||
| Tower Guards | ||||||
| Corporal | Neutral | Fighter | 5 | 34 | ||
| Corporal | Neutral | Fighter | 5 | 33 | ||
| Corporal | Neutral | Fighter | 5 | 30 | ||
| Corporal | Neutral | Fighter | 5 | 32 | ||
| Corporal | Neutral | Fighter | 5 | 33 | ||
| Sergeant | Neutral | Fighter | 4 | 39 | ||
| Officer's Mess | ||||||
| Captain | Good | Samurai | 3 | 54 | Twilight Cloak | |
| Lieutenant | Good | Fighter | 4 | 48 | ||
| Lieutenant | Neutral | Fighter | 0 | 39 | ||
| Lieutenant | Neutral | Fighter | 0 | 44 | ||
| Lieutenant | Good | Fighter | 4 | 43 | ||
| First Lieutenant | Good | Fighter | 0 | 49 | ||
| Something Cute | ||||||
| Hellpuppy | Evil | Ninja | 1 | 166 | ||
| Slavering Hound | ||||||
| Hell Hound | Evil | Fighter | -2 | 222 | Demonic Chimes | |
Level VIII - Land of a Thousand Cuts
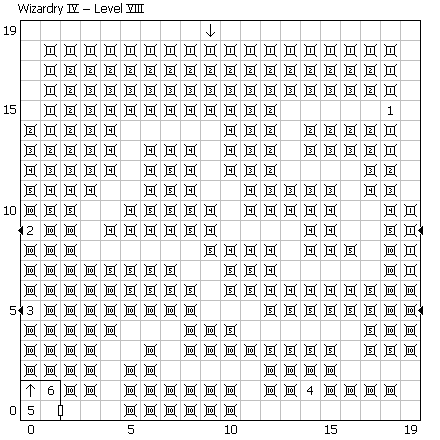
- Pentagram: Rotting Corpses, Dragon Flies, Spirits, Harpies, Bugbears, Wererats,
Ronins, Gaze Hounds, Banshees, Shades, Level 5 Priests, Looters.
Recommended Creatures: Spirits (mahalito), Shades (drain levels), and Level 5 Priests (lomilwa and healing). - Get Golden Pyrite here.
- Get Amber Dragon here.
- Get the Witching Rod if you wade in the pool here. You lose half your hit points doing this.
- Fixed encounter with a Clay Figure.
- Fixed encounter with an Assassin.
| Player | Align | Class | AC | HP | Treasure | |
|---|---|---|---|---|---|---|
| Arcturus's Avengers | ||||||
| Thor | Evil | Fighter | 2 | 64 | ||
| Darkon | Evil | Fighter | 2 | 66 | ||
| Gideon | Evil | Fighter | 2 | 70 | ||
| Daibalo | Neutral | Fighter | 2 | 56 | Longsword, Leather+1, Large Shield, P of Dios, P of Porfic | |
| Arcturus | Evil | Priest | 3 | 39 | ||
| Zacheri | Evil | Bishop | 5 | 32 | Small Shield, Jeweled Amulet, P of Sopic | |
| Abduul's Artful Dodgers | ||||||
| Gaelen | Neutral | Samurai | 3 | 57 | P of Porfic, P of Dios, ... | |
| Caldor | Neutral | Fighter | 4 | 48 | ||
| Arhenius | Evil | Priest | 5 | 67 | ||
| Lynsing | Evil | Bishop | 5 | 38 | ||
| Abduul | Neutral | Thief | 6 | 34 | Shortsword, Small Shield, P of Dios, P of Porfic | |
| Morkoth | Evil | Mage | 9 | 21 | ||
| Other Random Encounters | ||||||
| Kazrak | Evil | Fighter | 4 | 50 | Longsword+1, Leather+1, Helm, P of Dios, P of Porfic | |
| Bananarama | Neutral | Fighter | 3 | 56 | Longsword+1, Breast Plate, Large Shield, P of Dios | |
| Bugnews | Good | Fighter | 3 | 56 | Longsword+1, Breast Plate, Large Shield, P of Dios, P of Porfic | |
| Merlin | Evil | Fighter | 3 | 56 | Longsword+1, Leather+1, Large Shield, Helm, P of Porfic | |
| Tars Tarkas | Evil | Fighter | 3 | 56 | Longsword+1, Leather+1, Large Shield, P of Porfic | |
| Thalessa | Evil | Fighter | 3 | 56 | Longsword, Chain Mail, Large Shield, Helm | |
| Xenic | Neutral | Fighter | 3 | 56 | Longsword, Leather+1, Large Shield, Helm, P of Dios | |
| Spell-Weaver | Neutral | Mage | 9 | 22 | Staff, Dagger, Robes, P of Dios | |
| Drip | Evil | Mage | 9 | 24 | Robes, S of Badios, P of Dios, P of Porfic | |
| Gytr | Good | Mage | 9 | 24 | Robes, S of Halito, S of Katino, P of Porfic | |
| Fank | Good | Priest | 5 | 43 | Anointed Mace, Chain Mail, Small Shield, P of Dios, P of Porfic | |
| Memole | Evil | Thief | 6 | 36 | Leather Armor, Small Shield, P of Dios, P of Porfic | |
| Oger | Evil | Thief | 6 | 40 | Leather Armor, S of Katino, P of Dios, P of Porfic | |
| Aspergil | Good | Bishop | 4 | 36 | Anointed Mace, Chain Mail, Large Shield, P of Dios | |
| Dreadnok | Neutral | Bishop | 4 | 36 | Anointed Mace, Chain Mail, Large Shield, P of Dios | |
| Lord Gwydion | Good | Lord | 2 | 56 | Anointed Flail, Leather+1, Large Shield, P of Porfic | |
| A Clay Figure | ||||||
| Golem | Evil | Fighter | 2 | 300 | Longsword+1, Chain Mail+1, Large Shield, Helm, P of Dios | |
| An Assassin | ||||||
| Glum | Evil | Ninja | -3 | 220 | Black Box, S of Badios, S of Halito, P of Sopic | |
Level VII - Temple of the Dreampainter
- Pentagram: Blink Dogs, Bushwackers, Moat Monsters, Strangler Vines, Giant Toads, Vorpal Bunnies,
Giant Slugs, Goblin Shamans, Goblins, Cockatrics, Ogres, Priestesses
Recommended creatures: Goblin Shamans (mahalito), Priestesses (healing), and Spirits (from previous pentagram). - You fall off the ziggurat. The level here is drawn as to convey an illusion that north is "up". When you step off the outside of the ziggurat, you lose 4 hp, and "fall" one square south.
- Temple altar with three stone holes:
- If you donate gold, it vanishes before it hits the altar.
- If you use one of the three stones (without invoking it), a bolt of lightning destroys it.
- If you use any other item, a bolt of lightning destroys you.
- If you use all three stones, after invoking them, you can get your choice of the East Wind Sword, West Wind Sword, and Dragon's Claw.
- Get Hopalong Carrot here. Also acts like a sky square like all #2s.
- If you invoke the Carrot here, you will hop over the wall to the east.
- Fixed encounter with God's Oshabti.
| Player | Align | Class | AC | HP | Treasure | |
|---|---|---|---|---|---|---|
| Thorin's Tramplers | ||||||
| Zevs | Neutral | Samurai | 0 | 107 | ||
| Zarcon | Good | Fighter | 0 | 96 | ||
| Lance | Neutral | Fighter | 0 | 96 | ||
| Laenger | Good | Bishop | 3 | 28 | Mace+1, Small Shield | |
| Thorin | Good | Bishop | 3 | 300 | MordorCharge, ... | |
| Arawn | Neutral | Mage | 9 | 58 | ||
| Sorriman's Sorcerers | ||||||
| Zac | Neutral | Samurai | 1 | 108 | ||
| Sajak | Neutral | Fighter | 2 | 62 | ||
| Exodor | Neutral | Fighter | 2 | 91 | Longsword, Chain Mail, Large Shield, Helm, P of Porfic | |
| Warmtung | Evil | Priest | 3 | 81 | ||
| Webiran | Evil | Bishop | 3 | 60 | ||
| Sorriman | Evil | Mage | 9 | 119 | Cape of Jackal, ... | |
| Other Random Encounters | ||||||
| Bonis | Neutral | Fighter | 3 | 62 | Longsword+1, Leather+1, Large Shield, P of Dios | |
| Cutter | Neutral | Fighter | 3 | 62 | Longsword+1, Breast Plate, P of Dios | |
| Lignin Lord | Evil | Fighter | 3 | 62 | Longsword+1, Leather+1, Large Shield, P of Dios, P of Porfic | |
| Taz | Evil | Fighter | 3 | 62 | Longsword+1, Breast Plate, Helm, P of Dios, P of Porfic | |
| Electro | Good | Fighter | 2 | 68 | Breast Plate, Large Shield, Helm, P of Dios | |
| Toen | Neutral | Fighter | 2 | 68 | Longsword+1, Breast Plate, Helm, P of Porfic | |
| Flint | Good | Fighter | 2 | 68 | Longsword+1, Breast Plate, Helm, P of Dios, P of Porfic | |
| AC/DC | Evil | Mage | 9 | 26 | Dagger, S of Badios, S of Halito, P of Porfic | |
| Bankis | Neutral | Mage | 9 | 26 | S of Halito, S of Katino, P of Dios, P of Porfic | |
| Ilure | Neutral | Mage | 9 | 28 | Staff, Staff of Mogref, Jeweled Amulet, S of Badios, S of Halito, P of Sopic | |
| Sakura | Evil | Mage | 9 | 28 | Staff of Mogref, Robes, S of Badail, S of Dilto, P of Porfic, P of Sopic | |
| Tele-Vipers | Good | Mage | 9 | 28 | ? | |
| Warty | Neutral | Mage | 9 | 28 | ? | |
| Voltar | Good | Mage | 9 | 28 | Robes, S of Badios, S of Halito, S of Katino, P of Dios, P of Sopic | |
| Vee Dub | Good | Priest | 4 | 53 | Shield+1, Jeweled Amulet | |
| Killer | Neutral | Ninja | 6 | 64 | Shadow Cloak, S of Halito, P of Dios, P of Dios | |
| God's Oshabti | ||||||
| *Dreampainter* | Good | Fighter | -4 | 450 | Dreampainter KA, Mage Masher, Plate+1, Shield+1, Helm+1, Copper Gloves | |
Level VI - Realm of the Whirling Dervish
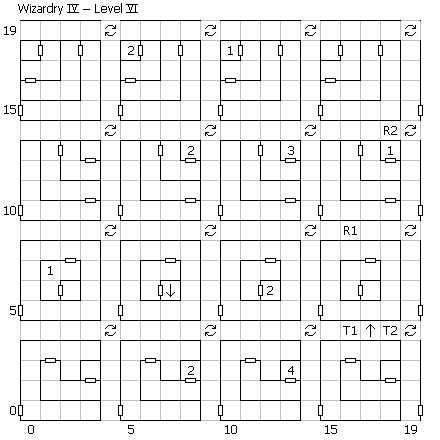
Note that at every intersection, there are fake doors mounted on the walls such that all four directions out of the spinner look identical. However, only the doors marked on the map actually work. You can tell if you left a spinner north or south by checking which door "works". If neither door works, then you went either east or west -- you won't know which way though without casting a dumapic.
- Pentagram: Level 3 Samurai, Grave Mists, High Corsairs, Minor Daiyamos, Lifestealers,
Nightstalkers, Wights, Master Ninjas, Bishops, Werewolves, Hobgoblins, Centaurs.
Recommended Creatures: Wights (drain level, paralyze, dalto, mahalito), Bishops (lahalito, healing), Goblin Shamans (from previous pentagram) - Fixed encounter with He Who Waits. Teleported to (2,6) if victorious.
- The answer to the riddle here is "Amulet". You get the Good Hope Cape if you answer correctly.
- Fixed encounter with a Chepachet Druid. Teleported to (17,4) if victorious.
| Player | Align | Class | AC | HP | Treasure | |
|---|---|---|---|---|---|---|
| Myriad's Mauraders | ||||||
| Scorpion | Neutral | Samurai | 0 | 100 | ||
| Myriad | Good | Priest | 3 | 91 | ||
| Zodac | Good | Bishop | 3 | 135 | ||
| Xavier | Good | Bishop | 3 | 78 | Mace+1, ... | |
| Arial | Neutral | Thief | 6 | 83 | ||
| Pestilian | Neutral | Mage | 9 | 58 | ||
| Gomez's Gorillas | ||||||
| Dagady | Evil | Ninja | 2 | 266 | ||
| Ross | Neutral | Samurai | 0 | 67 | ||
| Zoidack | Neutral | Fighter | 0 | 85 | ||
| Gomez | Evil | Priest | 1 | 78 | St. Rimbo Digit, ... | |
| Blackstone | Evil | Bishop | 3 | 95 | ||
| Winder | Neutral | Thief | 6 | 77 | ||
| Other Random Encounters | ||||||
| Ascii | Neutral | Fighter | 2 | 74 | Longsword, Leather+1, Large Shield, P of Dios, P of Porfic | |
| Cadidelhop | Good | Fighter | 2 | 74 | Leather+1, Helm, P of Dios, P of Porfic | |
| Fearless Farley | Good | Fighter | 2 | 74 | Longsword+1, Leather+1, Helm, P of Dios, P of Porfic | |
| Raven | Neutral | Fighter | 2 | 74 | Longsword, Chain Mail, Large Shield, Helm | |
| Chico | Good | Fighter | 1 | 80 | Were Slayer, Chain Mail+1, Helm, Copper Gloves, P of Dios, P of Porfic | |
| Elrik | Evil | Fighter | 1 | 80 | Were Slayer, Helm+1 | |
| Little Conan | Neutral | Fighter | 1 | 80 | Longsword+1, Chain Mail+1, Shield+1, Helm+1, P of Dios, P of Porfic | |
| Wacker | Good | Fighter | 1 | 80 | Were Slayer, Plate Mail, Helm+1, P of Dios | |
| Zyxxus | Neutral | Fighter | 1 | 80 | Were Slayer, Chain Mail+1, Shield+1, Helm+1, P of Porfic | |
| Chiquita | Neutral | Mage | 9 | 30 | Staff, Staff+2, S of Badios, S of Dilto | |
| Tharagorn | Good | Mage | 9 | 32 | Staff of Mogref, S of Badios, S of Katino, P of Porfic | |
| Boz | Neutral | Thief | 5 | 52 | Shortsword+1, Darkness Cloak, S of Badios, S of Halito | |
| Winder | Neutral | Thief | 6 | 77 | Leather+1, Small Shield, S of Badios, S of Halito | |
| Tiltowait | Evil | Bishop | 2 | 52 | Mace+1, Chain Mail+1, Shield+1 | |
| Gor-Y | Evil | Samurai | 0 | 92 | Longsword+1, Chain Mail+1, Shield+1, Copper Gloves | |
| Armondo | Good | Lord | 0 | 80 | Longsword+1, Plate Mail, Shield+1, Jeweled Amulet | |
| Pedro | Good | Ninja | 4 | 56 | S of Badios, P of Dios, P of Sopic, P of Sopic | |
| He Who Waits | ||||||
| Sentinel | Neutral | Fighter | -1 | 335 | Were Slayer, Chain Mail+1, Shield+1, Helm+1, P of Dios | |
| Chepachet Druid | ||||||
| Jesse the Smith | Neutral | Mage | 6 | 89 | Arabic Diary, Initiate Turban, S of Badios, S of Katino, S of Mogref, P of Dios | |
Level V - The Creatures of Light and Darkness
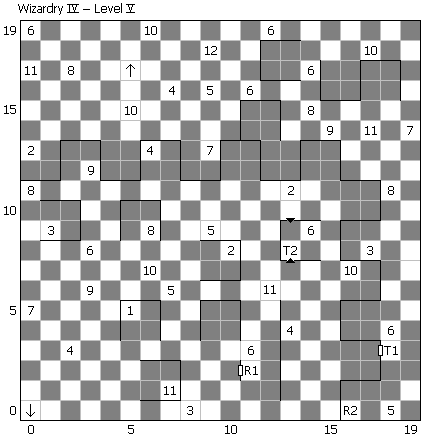
- Pentagram: Gargoyles, Ghasts, Komodo Dragons, Hellhounds, Priests of Fung, Masters/Dragons,
Seraphim, Weretigers, Boring Beetles, Displacer Beasts, Corrosive Slimes, Gas Dragons.
Recommended Creatures: Priests of Fung, Gas Dragons (breath weapon), Wights (from previous pentagram). - Fixed encounter with D-1 Creature.
- Fixed encounter with D-2 Creature.
- Fixed encounter with D-3 Creature.
- Fixed encounter with D-4 Creature.
- Fixed encounter with D-5 Creature.
- Fixed encounter with L-1 Creature.
- Fixed encounter with L-2 Creature.
- Fixed encounter with L-3 Creature.
- Fixed encounter with L-4 Creature.
- Fixed encounter with Pair of L-5 Pioneers.
- Get Oxygen Mask here.
| Player | Align | Class | AC | HP | Treasure | |
|---|---|---|---|---|---|---|
| Raiden's Raiders | ||||||
| Airian | Evil | Ninja | 4 | 56 | S of Badial, P of Dios, P of Dios, P of Porfic | |
| Raiden | Neutral | Samurai | 0 | 93 | ||
| Jinsu | Neutral | Fighter | -2 | 85 | ||
| Telcontar | Evil | Priest | 1 | 62 | ||
| Marlin | Evil | Thief | 6 | 87 | ||
| Aurelius | Evil | Mage | 9 | 36 | ||
| Horin's Holy Rollers | ||||||
| Horin | Good | Lord | -8 | 170 | Mace+1, Plate Mail, Shield+1, Jeweled Amulet, S of Badial | |
| Cantor | Good | Lord | 0 | 118 | ||
| Melhemia | Good | Lord | 0 | 134 | ||
| Narza | Good | Priest | 1 | 107 | ||
| Naylon | Good | Priest | 0 | 67 | ||
| Wincen | Good | Bishop | 0 | 46 | Magician's Hat, ... | |
| Other Random Encounters | ||||||
| Sultan | Good | Fighter | 1 | 80 | Were Slayer, Breast Plate, Shield+1, Copper Gloves | |
| Zandor | Neutral | Fighter | 1 | 80 | Shield+1, Helm+1, Copper Gloves, P of Dios, P of Porfic | |
| Interface | Neutral | Mage | 9 | 32 | Staff, Staff of Mogref, S of Badial, S of Katino, P of Sopic | |
| Login | Good | Mage | 9 | 32 | Staff+2, Jeweled Amulet, S of Badios, S of Badial, S of Halito, P of Sopic | |
| Mage Marian | Good | Mage | 9 | 34 | Staff, Staff+2, S of Badios, S of Dilto, S of Halito | |
| Seleg | Good | Priest | 3 | 68 | Mace+1, Chain Mail, Shield+1 | |
| Aurelia | Evil | Priest | 3 | 73 | Mace+1, Breast Plate, Jeweled Amulet, P of Sopic | |
| Fingers | Neutral | Thief | 4 | 56 | Shortsword+1, Leather+1, Small Shield, P of Sopic | |
| Molyx | Evil | Thief | 4 | 56 | Shield+1, Jeweled Amulet, S of Badial, S of Holito | |
| Daja | Neutral | Thief | 4 | 60 | Small Shield, Shield+1, S of Halito, P of Sopic | |
| Quilen | Neutral | Thief | 4 | 60 | Shortsword+1, Small Shield, S of Halito, P of Sopic | |
| Telima | Neutral | Thief | 4 | 60 | Cape of Hide, Shield+1, Jeweled Amulet, S of Badial, P of Sopic | |
| Chryseis | Evil | Bishop | 1 | 60 | Large Shield, Shield+1, Jeweled Amulet, P of Sopic | |
| Stilgar | Good | Bishop | 1 | 60 | Mace+1, Shield+1 | |
| Samson | Good | Samurai | 0 | 99 | Dragon Slayer, Shield+1, Helm+1 | |
| Sturm | Good | Ninja | 4 | 60 | S of Badios, P of Dios, P of Sopic, P of Sopic | |
| D-1 Creature | ||||||
| Io | Evil | Fighter | -1 | 135 | ||
| D-2 Creature | ||||||
| Lappet | Evil | Mage | 0 | 122 | ||
| D-3 Creature | ||||||
| Gaudy Sphynx | Evil | Priest | -3 | 176 | ||
| D-4 Creature | ||||||
| Emperor Tau | Evil | Thief | 0 | 134 | ||
| D-5 Creature | ||||||
| Death's Head | Evil | Ninja | -5 | 196 | ||
| L-1 Creature | ||||||
| Meleager Blue | Good | Fighter | -2 | 100 | ||
| L-2 Creature | ||||||
| Silverstripe | Good | Mage | 5 | 70 | ||
| L-3 Creature | ||||||
| Purple Emperor | Good | Priest | -3 | 145 | ||
| L-4 Creature | ||||||
| Golden Danaid | Good | Bishop | -3 | 129 | ||
| Pair of L-5 Pioneers | ||||||
| Mistress Flavia | Good | Lord | -5 | 200 | Were Slayer, Plate Mail, Shield+2, P of Sopic | |
| John AP Griffin | Good | Lord | -5 | 200 | Dragonslayer, Plate Mail+1, Shield+1, Winged Boots | |
Level IV - The Maze of Wandering
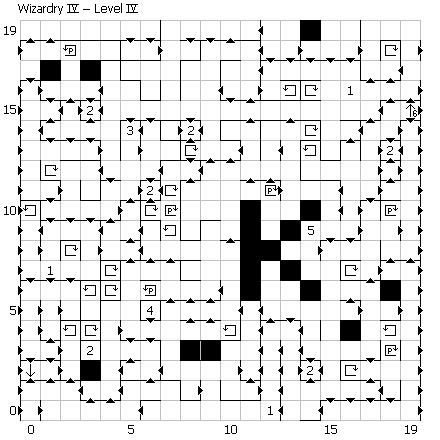
Due to the complex nature of this maze, there may be some errors, particularly with post-rotator rooms. In particular, it seems that many of the exits from rotators are one-way walls, which makes mapping and tracking their rotations difficult.
- Pentagram: Scrylls, Carriers, Myrmidons, Gorgons, Level 6 Ninjas, Dark Riders,
Doppelgangers, Giant Mantises, Evil Eyes, Goblin Princes, Masters w/ Wind, Wyverns
Recommended creatures: Evil Eyes (breath weapon), Wights and Priests of Fung (from previous pentagrams) - A cage. You can use a Get Out of Jail Free card in one of these rooms to escape: you will be moved in a random direction. Otherwise, you can only malor out, back to level 9.
- A witch here will create a Dab of Puce for you if you bring her the six necessary ingredients: Rabbit's Fur (Magician's Hat), FeS2 (Golden Pyrite), Tannic Acid (Witching Rod), Camphor (Aromatic Ball), Spanish Ungent (Cleansing Oil), and a Blender (Blade Cusinart').
- Bathing in this pool will change your alignment from Evil to Neutral.
- Get Aromatic Ball here.
- Stairs here lead up to (15,11) on level 1.
| Player | Align | Class | AC | HP | Treasure | |
|---|---|---|---|---|---|---|
| Khan's Kosmic Killers | ||||||
| Greymusser | Evil | Priest | 1 | 105 | ||
| Toranaga | Evil | Bishop | 0 | 113 | Shield+1, Jeweled Amulet, P of Sopic | |
| Toran | Neutral | Thief | 6 | 106 | Shield+1, Jeweled Amulet, S of Badios, S of Halito | |
| Khan | Neutral | Thief | 3 | 115 | Get Out of Jail Free | |
| Ice Jaws | Evil | Mage | 9 | 81 | ||
| Deth | Evil | Mage | 9 | 92 | ||
| Dorion's Greys | ||||||
| Greystone | Neutral | Fighter | -2 | 84 | ||
| Reiko | Neutral | Fighter | -2 | 87 | ||
| Greyrat | Evil | Priest | 1 | 107 | ||
| Quil | Neutral | Thief | 6 | 88 | ||
| Dorion | Neutral | Mage | 9 | 93 | ||
| Narkneeia | Evil | Mage | 9 | 43 | Staff+2, Staff of Mogref, S of Badios, S of Dilto, S of Halito, P of Porfic | |
| Other Random Encounters | ||||||
| Darwin | Neutral | Fighter | 1 | 86 | Wereslayer, Helm+1, Copper Gloves, P of Dios, P of Porfic | |
| Urbo | Evil | Fighter | 1 | 86 | Wereslayer, Shield+1, Helm+1, Copper Gloves | |
| Starleto | Evil | Fighter | 0 | 98 | Longsword+1, Plate Mail, Shield+1, Copper Gloves, P of Dios | |
| Celica | Neutral | Fighter | -1 | 104 | Longsword+1, Leather+1, Helm+1, P of Porfic | |
| Dr. X | Evil | Fighter | -1 | 104 | Wereslayer, Longsword+1, Plate Mail, Helm, Get Out of Jail Free, P of Dios | |
| Fireslinger | Good | Fighter | -1 | 104 | Wereslayer, Leather+1, Helm, P of Dios | |
| Swift-One | Good | Mage | 9 | 34 | Staff+2, Robes, S of Katino, P of Dios, P of Porfic | |
| Trueno | Neutral | Mage | 9 | 36 | Staff, Robes, Jeweled Amulet, S of Katino, P of Porfic, P of Sopic | |
| Yuron | Good | Mage | 9 | 38 | Staff, Staff of Mogref, Jeweled Amulet | |
| Shandra | Evil | Priest | 2 | 83 | Chain Mail+1, Shield+1 | |
| Stalker | Neutral | Thief | 3 | 68 | Night Cloak, Shortsword+1, Small Shield, S of Badial, P of Sopic | |
| Kotran | Good | Bishop | 1 | 60 | Leather+1, Large Shield | |
| Double-Strike | Good | Bishop | 0 | 64 | Mace+1, Chain Mail+1 | |
| Brud | Neutral | Samurai | -1 | 106 | Dragonslayer, Plate Mail, Helm | |
| Deadly-Hand | Good | Ninja | 3 | 64 | S of Badios, S of Badios, S of Halito, P of Dios | |
| Demonslayer | Good | Ninja | 3 | 68 | S of Badios, S of Badial, S of Halito, P of Dios | |
Level III - The Cosmic Cube
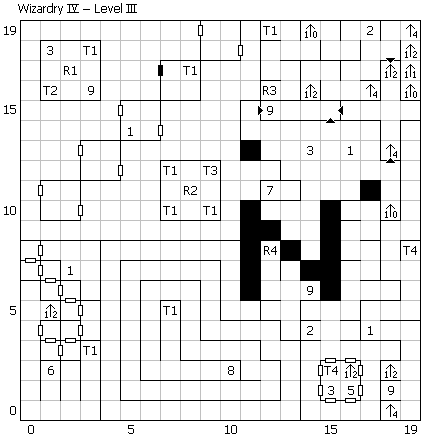
- Pentagram: Brass Dragons, Fiends, Will o' Wisps, Berserkers, Chimeras, Xenos,
Bleebs, Rocs, Major Daimyos, Trools, Champ Samurai, Vampires.
Recommended creatures: Brass Dragons, Fiends, and Champ Samurai. - Pentagram from level 10. This pentagram will still raise you to 8th level.
- Chute to (0,9) on level 2.
- Stairs up to (1,14) on level 2.
- Chute to (3,7) on level 2.
- Teleporter to (12,7) on level 2.
- Chute to (14,9) on level 2.
- Teleporter to (3,0) on level 1.
- Teleporter to (3,5) on level 1.
- Stairs up to (6,19) on level 1.
- Stairs up to (16,3) on level 1.
- Stairs up to (19,19) on level 1.
| Player | Align | Class | AC | HP | Treasure | |
|---|---|---|---|---|---|---|
| Blackthorn's Blackguards | ||||||
| Camedhil | Evil | Ninja | -6 | 236 | ||
| Camthauri | Evil | Ninja | -7 | 254 | ||
| Blackthorn | Neutral | Samurai | -4 | 192 | ||
| Gorlan | Evil | Fighter | -8 | 192 | ||
| Manta | Evil | Priest | -3 | 156 | Chain Mail, Jeweled Amulet, P of Sopic | |
| Quimby | Neutral | Thief | 5 | 119 | ||
| The Company | ||||||
| Argon | Good | Lord | LO | 202 | Wizard Skullcap, ... | |
| Thorninside | Good | Lord | -5 | 124 | ||
| Dry Gimili | Neutral | Samurai | -3 | 156 | ||
| Elkrand | Good | Bishop | -1 | 104 | ||
| Pepe le Phew | Neutral | Thief | 5 | 78 | ||
| Grandoaf | Good | Mage | 7 | 157 | ||
| Other Random Encounters | ||||||
| Bytor | Neutral | Fighter | -6 | 170 | ||
| Hunter | Good | Fighter | -2 | 116 | Longsword+1, Leather+1, P of Dios, P of Porfic, ... | |
| Sterling | Good | Fighter | -2 | 116 | Shield+1, Helm, Copper Gloves, P of Dios | |
| Eowyn | Good | Fighter | -2 | 122 | Were Slayer, Copper Gloves, P of Dios, P of Sopic | |
| Mowran | Good | Fighter | -5 | 152 | Mage Masher, Were Slayer, Dragon Slayer, Longsword+2, ... | |
| Othus | Neutral | Fighter | -6 | 170 | Mage Masher, Were Slayer, Longsword+1, Longsword+2, ... | |
| Conan Coffee | Neutral | Fighter | -6 | 176 | ||
| Crow | Neutral | Mage | 9 | 48 | Staff, Staff of Montino, Robes, S of Dilto, ... | |
| Illuvatar | Evil | Mage | 9 | 62 | ||
| Sinbar | Evil | Priest | 1 | 98 | Shield+1, P of Sopic | |
| Mutha | Evil | Priest | -1 | 133 | Shield+1, Jeweled Amulet, Rod of Flame, Ring of Porfic, ... | |
| Jaxom | Good | Priest | -2 | 143 | Jeweled Amulet, Rod of Flame, P of Sopic | |
| Sly | Neutral | Thief | 2 | 80 | Leather+1, Jeweled Amulet, S of Badial, P of Sopic | |
| Frodough | Neutral | Thief | 2 | 88 | Ring of Dispelling, Ring of Death | |
| Bilbous Baggins | Neutral | Thief | 2 | 92 | Shield+1, Ring of Healing, P of Dial | |
| Z-Man | Evil | Bishop | -2 | 84 | Chain Mail, Large Shield, Jeweled Amulet, P of Sopic | |
| Chauncy | Neutral | Samurai | -3 | 141 | Mage Masher, Shield+2, Helm+1, Amulet of Makanito, ... | |
| Asgard | Evil | Lord | -4 | 128 | Mage Masher, Silver Gloves, Amulet of Makanito, S of Badial | |
| Blacktooth | Evil | Ninja | -4 | 120 | ||
Level II - The Cosmic Cube
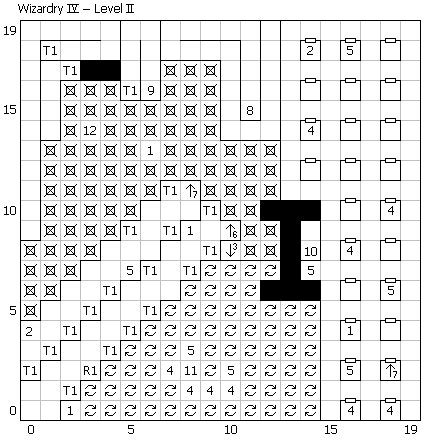
- Pentagram: Murphy's Ghosts, Manticores, Liches, Frost Giants, Fire Giants, Hamamotos,
Masters/Summer, Hydrae, Succubi, Fire Drakes, Dragon Zombies, Cyclopses.
Recommended creatures: Dragon Zombies, Fiends (from previous pentagram), and Master Samurai (from previous pentagram). - Pentagram from level 10. This pentagram will still raise you to 9th level.
- Stairs down to (10,9) on level 3.
- Teleporter to (19,14) on level 3.
- Chute to (3,11) on level 2.
- Stairs up to (5,19) on level 2.
- Stairs up to (0,7) on level 1.
- Chute to (2,7) on level 1.
- Chute to (9,19) on level 1.
- Chute to (13,9) on level 1.
- Teleporter to (18,14) on level 1.
- Buy Cleansing Oil for 50,000gp.
| Player | Align | Class | AC | HP | Treasure | |
|---|---|---|---|---|---|---|
| Joachim's Jihad | ||||||
| Schrombo | Good | Lord | -3 | 170 | Blade Cusinart', ... | |
| Yps Von Uffel | Good | Lord | -5 | 146 | ||
| Joachim Deeg | Good | Priest | -6 | 219 | ||
| Teut Weidemann | Good | Bishop | -3 | 90 | Shield+2, Rod of Flame, S of Badial, P of Sopic | |
| The Bros. Kohlen | Good | Bishop | -3 | 108 | Pennonceaux, ... | |
| Mr. Rust | Good | Mage | 9 | 142 | ||
| Elindull's Evil Elites | ||||||
| Sibilant | Evil | Ninja | -8 | 246 | Entropy Cloak, ... | |
| Elindull | Evil | Lord | LO | 250 | ||
| Falkrin | Evil | Fighter | -6 | 266 | ||
| Mad Dog | Evil | Fighter | -6 | 336 | ||
| Darkhorse | Evil | Priest | -3 | 206 | ||
| Darty | Evil | Thief | 2 | 198 | Leather+1, Shield+1, Ring of Death, Amulet of Badailma, Rod of Flame | |
| Other Random Encounters | ||||||
| Mjolner | Evil | Fighter | -6 | 422 | ||
| Raist | Neutral | Mage | 9 | 80 | Staff+2, Staff of Montino, Dagger of Speed, Ring of Dispelling, Ring of Healing, Amulet of Badialma, Jeweled Amulet, S of Badial | |
| Stomach | Good | Priest | -3 | 173 | Amulet of Badialma, Amulet of Makanito | |
| Yuri | Good | Priest | -3 | 183 | Mace of Curing, Chain Pro Ice, Shield+1, Ring of Dispelling, Ring of Porfic, P of Dial | |
| Elizar | Good | Priest | -3 | 208 | Ring of Death, Ring of Porfic, Jeweled Amulet, Amulet of Makanito | |
| Trevor Lockleer | Neutral | Priest | -3 | 253 | ||
| Eldosaberry | Evil | Priest | -3 | 263 | ||
| Dallben | Good | Priest | -3 | 268 | ||
| Slik | Neutral | Thief | 2 | 148 | Shield+1, Shield+2, Ring of Death, Ring of Healing, Amulet of Badialma | |
| Shadow | Evil | Thief | 2 | 160 | Leather+1, Ring of Dispelling, Amulet of Badialma | |
| Scios | Evil | Thief | 2 | 168 | Shield+1, Ring of Death, Amulet of Badailma | |
| Shades | Neutral | Thief | 2 | 256 | ||
| Aneas | Neutral | Thief | 2 | 264 | ||
| Spells=Wishes | Evil | Bishop | -3 | 164 | Ring of Death, Ring of Dispelling, Amulet of Makanito, S of Badial | |
| Sunburst | Evil | Bishop | -3 | 192 | ||
| Firestorm | Evil | Bishop | -3 | 200 | ||
| Spell Bound | Evil | Bishop | -3 | 204 | ||
| Guthalion | Evil | Bishop | -3 | 214 | Jeweled Amulet, S of Badial, S of Dilto, P of Dial, P of Sopic | |
| Alpine | Good | Bishop | -3 | 216 | ||
| Master Caster | Evil | Bishop | -3 | 264 | ||
| Magister | Good | Bishop | -3 | 276 | ||
| Bink | Good | Bishop | -3 | 284 | ||
| Ferman | Neutral | Samurai | -5 | 288 | Muramasa Blade, Longsword+2, Dragon Slayer, Helm+1, Copper Gloves, Ring of Dispelling, Amulet of Badialma | |
| Bomart | Neutral | Samurai | -5 | 295 | Blade Cusinart', Muramasa Blade, Helm+1, Silver Gloves, Ring of Porfic, Diadem of Malor | |
| Swords Man | Evil | Samurai | -5 | 295 | Muramasa Blade, Were Slayer, Copper Gloves, Silver Gloves, Diadem of Malor, Ring of Porfic, P of Dial | |
| Morgin | Good | Samurai | -5 | 400 | ||
| Andomus | Neutral | Samurai | -5 | 505 | ||
| Muramoto | Good | Lord | LO | 410 | ||
| Titan | Neutral | Ninja | LO | 204 | ||
| Black Lantern | Evil | Ninja | LO | 260 | ||
| Excalibur | Evil | Ninja | LO | 264 | ||
Level I - The Cosmic Cube
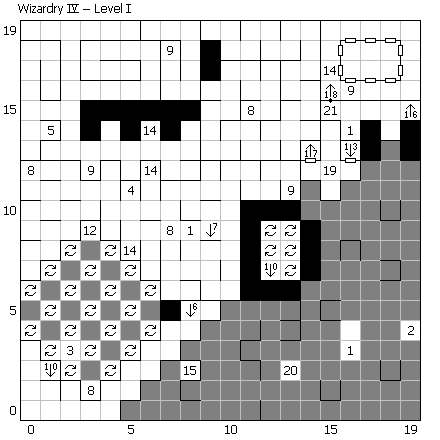
- Pentagram: Greater Demons, Poison Giants, Gold Dragons, Maelifics, Vampire Lords, High Masters,
Lycorgi, Black Dragons, Foaming Molds, Iron Golems, Flack, Demon Lords.
Recommended Creatures: Demon Lord (poison, petrify, paralyze, drain 5 levels, decapitate, tiltowait), Greater Demons (poison, petrify, paralyze, drain 3 levels, tiltowait and they multiply), and any other group except High Masters or Foaming Molds. - Pentagram from level 7. This pentagram will still raise you to 10th level.
- Pentagram from level 8. This pentagram will still raise you to 10th level.
- Pentagram from level 9. This pentagram will still raise you to 10th level.
- Pentagram from level 10. This pentagram will still raise you to 10th level.
- Stairs down to (3,8) on level 3.
- Stairs down to (11,5) on level 3.
- Teleporter to (13,11) on level 3.
- Chute to (14,8) on level 3.
- Stairs down to (16,10) on level 3.
- Teleporter to (19,15) on level 3.
- Teleporter to (1,4) on level 2.
- Stairs down to (1,14) on level 2. Taking these stairs will remove the stairs at (15,16).
- Chute to (12,19) on level 2.
- Chute to (16,19) on level 2.
- Stairs up to (15,11) on level 1.
- Stairs up to (19,19) on level 1. Taking these stairs will remove the stairs at (15,16).
- Stairs up to (0,0) on level 0.
- The answer to the riddle here is to choose the center door. Consider the right door: If there is a lady behind it, then the right door is telling the truth. If there is a tiger behind it, the left door is telling the truth. Either way, the middle door can't be telling the truth (since only one door is truthful). Hence, the middle door is lying, so there isn't a tiger behind it. So the lady must be behind the middle door. If you get this riddle wrong and go through either of the other doors, the stairs leading out of the dungeon will vanish, trapping you in the Cosmic Cube forever.
- Buy St. Trebor's Rump for 100gp.
- If you use the Holy Handgrenade in this square, you will destroy the wall to the north. See the solution for full details.
| Player | Align | Class | AC | HP | Treasure | |
|---|---|---|---|---|---|---|
| Loktar's Lucky Ladies | ||||||
| Loktar | Evil | Ninja | LO | 282 | Holy Limp Wrist, ... | |
| Arioch the Kind | Evil | Ninja | LO | 343 | ||
| Raver | Neutral | Fighter | -5 | 294 | ||
| Megathus | Evil | Priest | -5 | 297 | ||
| Gulthalion | Evil | Bishop | -3 | 214 | ||
| Philthy | Neutral | Thief | 2 | 135 | Shield+1, Rod of Flame | |
| Applet's Angels | ||||||
| Falon | Good | Lord | LO | 341 | ||
| Meth | Good | Lord | LO | 304 | ||
| Goraukar | Good | Fighter | -5 | 367 | Were Slayer, Plate Mail+2, Silver Gloves, Ring of Death, Rod of Flame | |
| Armanir | Good | Priest | -3 | 364 | Shield+1, Shield+2, Ring of Death, Ring of Dispelling, Ring of Healing, S of Badial, P of Masopic, P of Sopic | |
| Applet | Good | Bishop | -5 | 248 | Adept Baldness, ... | |
| Turlack | Good | Mage | 7 | 222 | ||
| Other Random Encounters | ||||||
| Hawk Man | Good | Fighter | -4 | 200 | Longsword, Longsword+1, Leather+1, P of Sopic, ... | |
| Black Knight | Evil | Fighter | -5 | 399 | Breast Plate, Chain Mail, Leather+1, Large Shield, ... | |
| Brutus | Evil | Fighter | -6 | 470 | Longsword+2, Skull's Cap, Copper Gloves, Silver Gloves, ... | |
| Ares | Evil | Mage | 6 | 83 | ||
| Diggero | Good | Mage | 7 | 83 | ||
| Sprocket | Good | Mage | 8 | 161 | Staff+2, Robes, S of Badios, S of Halito, ... | |
| Zapp | Good | Mage | -6 | 169 | P of Dios, P of Sopic, P of Porfic, ... | |
| Darjon' | Good | Mage | -4 | 276 | ||
| Guildenstern | Good | Mage | -4 | 410 | Dagger+2, Staff of Montino, Staff, Rod of Flame, ... | |
| Thunderwalker | Good | Priest | -4 | 163 | Mace+1, Chain Mail, Leather+1, Jeweled Amulet, ... | |
| Dalamar | Evil | Priest | -4 | 173 | ||
| Colon | Good | Priest | -3 | 178 | Chain Pro Ice, Ring of Death, Ring of Healing, Jeweled Amulet | |
| Raistlin | Neutral | Priest | -4 | 234 | ||
| Dullben | Good | Priest | -3 | 268 | S of Badial, S of Dilto, P of Dial, P of Masopic, ... | |
| Nubs | Neutral | Thief | -3 | 164 | Shield+1, S of Badios, S of Badial, S of Halito | |
| Nermal | Neutral | Thief | 4 | 168 | Ring of Dispelling, Amulet of Badailma, Rod of Flame | |
| Subati | Neutral | Thief | -3 | 177 | ||
| Augie | Neutral | Thief | -4 | 199 | ||
| Lord Donsday | Evil | Bishop | -3 | 164 | ||
| Rah | Evil | Bishop | -4 | 186 | ||
| Lessa | Neutral | Samurai | -5 | 220 | ||
| Crysania | Evil | Samurai | -5 | 231 | ||
| Shadowstalker | Evil | Samurai | -6 | 375 | Longsword+1, Chain Mail+1, Breast Plate, Shield+1, Helm | |
| Kane | Neutral | Samurai | -6 | 636 | Muramasa Blade, Chain Pro Ice, Ring of Death, Ring of Healing, Diadem of Malor | |
| Strong Man | Evil | Lord | LO | 242 | Lord's Garb, Lord's Garb, Helm+1, Silver Gloves, Ring of Healing, Ring of Porfic, ... | |
| Kefer | Good | Lord | -6 | 284 | ||
| Kazy Dain | Good | Ninja | -9 | 208 | ||
| Venim | Evil | Ninja | -6 | 225 | ||
| Omer | Neutral | Ninja | -6 | 239 | S of Badial, S of Halito, S of Katino, P of Dios | |
| Khanical | Good | Ninja | -7 | 269 | S of Badial, S of Halito, P of Dios, P of Sopic | |
| Mephisto | Evil | Ninja | 6 | 278 | S of Halito, S of Halito, P of Dios | |
| Blade | Evil | Ninja | -6 | 280 | ||
| Odin | Neutral | Ninja | -8 | 284 | ||
| Loki | Evil | Ninja | -7 | 284 | S of Dilto, P of Dios, P of Dios, P of Porfic | |
| Isis | Evil | Ninja | -6 | 289 | ||
Level 0 - The Castle

- Stairs down to (15,16) on level 1.
- The password to enter the castle is "Trebor Sux". (You find this out in the endgame of Wizardry I.)
- The Training Grounds. Encounter with Von Halstern's Squares - Squad #3
- Fixed encounter with Von Halstern's Squares - Squad #2
- Fixed encounter with Von Halstern's Squares - Squad #1
- If you try to steal the Lych-Gate, you will be attacked by Boltac's Anti-Shoplifting Unit
- You need the Inn Key to get by here.
- Fixed encounter with the Walking Wounded.
- Stairs up to (14,12) on level 1up.
- Von Halstern's Chivalry. If you have the Crystal Rose, they will let you pass. Otherwise, they will attack.
- There are two buttons here marked "A" and "B". Pressing B will take you to (12,9) on level 1up.
- This fountain is broken. If you are wearing the Maintenance Cap, you will repair the fountain. Once the fountain is repaired, if you are Neutral, you can bathe in the fountain to become Good.
- The Captain's Council. If you have the Crystal Rose and you pay them 1,000,000gp, they will swear their loyalty to you and give you the Rallying Horn. Otherwise, they will attack you.
- Stairs up to (3,15) on level 1up.
There are no random encounters on this level.
| Player | Align | Class | AC | HP | Treasure | |
|---|---|---|---|---|---|---|
| Von Halstern's Squires -- Squad #3 | ||||||
| Tenaka | Good | Samurai | 8 | 16 | Longsword, Leather Armor | |
| Severin | Good | Fighter | 8 | 5 | Longsword, Leather Armor | |
| Kane | Good | Fighter | 8 | 5 | Longsword, Leather Armor | |
| Leopold | Neutral | Fighter | 8 | 5 | Longsword, Leather Armor | |
| Wolfgang | Good | Fighter | 8 | 9 | Longsword, Leather Armor | |
| Elanor | Good | Fighter | 8 | 10 | Longsword, Leather Armor | |
| Von Halstern's Squires -- Squad #2 | ||||||
| Chysogon | Good | Fighter | 7 | 10 | Longsword, Leather Armor, Small Shield | |
| Arthur | Good | Fighter | 7 | 9 | Longsword, Leather Armor, Small Shield | |
| Francis | Good | Fighter | 7 | 9 | Longsword, Leather Armor, Small Shield | |
| Max | Good | Fighter | 6 | 10 | Longsword, Leather Armor, Small Shield | |
| Guntar | Neutral | Fighter | 7 | 9 | Longsword, Leather Armor, Small Shield | |
| Corwin | Good | Fighter | 5 | 15 | Longsword, Leather Armor, Small Shield | |
| Von Halstern's Squires -- Squad #1 | ||||||
| Morton | Good | Fighter | 7 | 12 | Longsword, Breast Plate, Large Shield, P of Dios | |
| Jocko | Good | Fighter | 7 | 12 | Longsword, Breast Plate, Large Shield | |
| Vlad | Good | Fighter | 7 | 10 | Longsword, Breast Plate, Large Shield | |
| Erich | Good | Fighter | 4 | 15 | Longsword, Breast Plate, Large Shield | |
| Tristen | Good | Fighter | 6 | 16 | Longsword, Breast Plate, Large Shield | |
| 1st Sq. Albrecht | Good | Fighter | 3 | 26 | Longsword, Breast Plate, Large Shield | |
| Boltac's Anti-Shoplifting Unit | ||||||
| Air | Neutral | Ninja | -9 | 450 | ||
| Earth | Neutral | Fighter | -5 | 600 | ||
| Water | Neutral | Priest | -4 | 400 | ||
| Fire | Neutral | Mage | 0 | 330 | ||
| Captain's Council | ||||||
| Loktar | Evil | Ninja | LO | 282 | ||
| Joachim Deeg | Good | Priest | -6 | 219 | ||
| Gomez | Evil | Priest | 1 | 78 | ||
| Khan | Neutral | Thief | 3 | 115 | ||
| Rendor | Good | Mage | 9 | 8 | ||
| Sorrimann | Evil | Mage | 9 | 119 | ||
| Walking Wounded | ||||||
| Falon | Good | Lord | LO | 235 | ||
| Crom | Neutral | Samurai | -7 | 126 | ||
| Brightblade | Good | Samurai | 3 | 4 | ||
| Fireslinger | Good | Fighter | -1 | 21 | ||
| Pig-I-Iggy | Good | Priest | 7 | 2 | ||
| AC/DC | Evil | Mage | 9 | 5 | ||
| Von Halstern's Chivalry | ||||||
| Sir Manfred | Good | Fighter | -8 | 450 | ||
| Sir Magnus | Good | Fighter | -3 | 445 | ||
| Sir Hrymgrar | Good | Fighter | -7 | 420 | ||
| Duke Sir Hanno | Good | Fighter | -5 | 425 | ||
| Master Feral | Neutral | Fighter | -6 | 427 | ||
| Sir Vykor | Good | Fighter | -6 | 425 | ||
Level 1up - The Castle
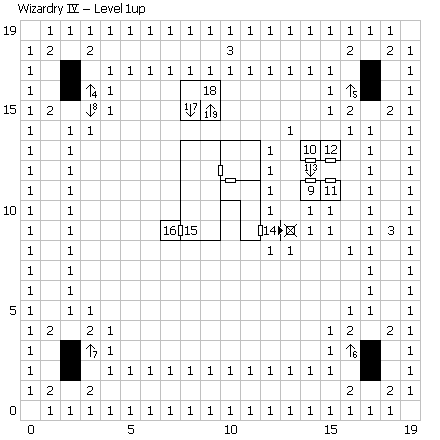
- You fall down one story (lose 39hp, and drop to level 0).
- Fixed encounter with an Eagle Eye
- Fixed encounter with a Trumpeteer. When you defeat him, you have a fixed encounter with the Honor Guard.
- Stairs up to (2,16) on level 2up.
- Stairs up to (17,16) on level 2up.
- Stairs up to (17,3) on level 2up.
- Stairs up to (2,3) on level 2up.
- Stairs down to (2,15) on level 0.
- If you have the Dab of Puce, you exchange it for the Arrow of Truth.
- If you have the Pennonceaux, you exchange it for the Orb of Dreams.
- If your alignment is Good and you have invoked St. Trebor's Rump (to free Trebor from his curse), then you get the Crystal Rose here. Otherwise, you have an encounter with the Ladies of the Rose.
- If you have one of the swords from the Dreampainter's Temple, you get the Maintenance Cap here.
- Stairs down to (14,11) on level 0.
- There are two buttons here, marked B and A. Pushing A takes you to (12,9) on level 0.
- Fixed encounter with Softtalk All-Stars Less One.
- There are two buttons here, marked C and B. Pushing B takes you to (7,9) on level 2up.
- Stairs down to (9,15) on level 0.
- Baron's Council. If you have the Crystal Rose, they will offer you their loyalty if you sign their contract. If you do, you get the Signet Ring. Otherwise, they teleport you to (9,10) on level 9. If you do not have the Crystal Rose, they attack.
- Stairs up to 8,15) on level 2up.
There are no random encounters on this level.
| Player | Align | Class | AC | HP | Treasure | |
|---|---|---|---|---|---|---|
| An Eagle Eye | ||||||
| Tower Sentry | Good | Fighter | 4 | 76 | ||
| A Trumpeteer | ||||||
| Herald | Good | Bishop | 0 | 91 | ||
| Honor Guard | ||||||
| Pikeman | Good | Fighter | -3 | 90 | ||
| Pikeman | Good | Fighter | -3 | 90 | ||
| Pikeman | Good | Fighter | -3 | 90 | ||
| Pikeman | Good | Fighter | -3 | 90 | ||
| Pikeman | Good | Fighter | -3 | 90 | ||
| Watch Officer | Good | Fighter | -6 | 160 | ||
| Ladies of the Rose | ||||||
| Du Khadijah | Good | Lord | -9 | 350 | ||
| Duchess Wanda | Good | Lord | -9 | 300 | ||
| Duchess Diana | Good | Lord | -9 | 300 | ||
| Du Kunegundra | Good | Lord | -9 | 300 | ||
| Countess Amber | Good | Lord | -7 | 250 | ||
| Countess Mara | Good | Lord | -7 | 250 | ||
| Softtalk All-Stars Less One | ||||||
| Sezmar | Good | Samurai | -7 | 780 | ||
| Sarah | Good | Priest | -5 | 772 | Blade Cusinart' | |
| Tuck | Good | Bishop | -6 | 791 | St. KA's Foot | |
| Moradin | Neutral | Thief | -2 | 736 | Dagger of Speed | |
| Prospero | Good | Mage | 5 | 638 | Diadem of Malor | |
| Baron's Council | ||||||
| Baron Yosef | Good | Ninja | LO | 401 | ||
| Sir Patri | Good | Lord | -9 | 412 | ||
| Baron Algemon | Neutral | Samurai | -6 | 350 | ||
| Baron Eofn | Good | Fighter | -5 | 399 | ||
| Baron Leonard | Good | Priest | -4 | 360 | ||
| Bar. Elspath | Good | Mage | 0 | 408 | ||
Level 2up - The Castle
- You fall down one story (lose 39hp, and drop to level 1up).
- You fall down two stories (lost 79hp, and drop to level 0).
- Stairs down to (3,16) on level 1up.
- Stairs down to (16,16) on level 1up.
- Stairs down to (16,3) on level 1up.
- Stairs down to (3,3) on level 1up.
- Fixed encounter with Tower Artillery.
- Fixed encounter with a Man Who Bows.
- Stairs down to (9,15) on level 1up.
- If you ask for the "Mythril Glove", you will receive it.
- Duke's Council. If you have the Singet Ring, Rallying Horn, Crystal Rose, Arrow of Truth, and Orb of Dreams, then they will ask if you will challenge them in single combat. If your refuse, they attack. If you accept, they offer you the crown; take it or leave it. Accepting the crown leads to ending #1. If you do not have all of those items, then they attack you.
- There are two buttons here, marked C and B. Pushing B takes you to (7,9) on level 1up.
- If you search here, you find the Void Transducer.
- Fixed encounter with Temple Priests.
- Fixed encounter with Hawkwind. He can only be defeated using a dink.
- The Statue of Kadorto:
- If you do not have the Holy Limp Wrist, then you can't get the Amulet out of the statue's grasp.
- If you do not have the Mythril Gauntlet equipped, then you vanish when you touch the amulet.
- If you do not have either the Kris of Truth or one of the swords from the Dreampainter's Temple equipped, then Kadorto slays you.
- If you do have all of those, you get endings #2 - #5. (The ending depends on which of the four swords you have equipped.)
There are no random encounters on this level.
| Player | Align | Class | AC | HP | Treasure | |
|---|---|---|---|---|---|---|
| Tower Artillery | ||||||
| Crossbowman | Good | Fighter | -7 | 110 | ||
| Crossbowman | Good | Fighter | -7 | 110 | ||
| Crossbowman | Good | Fighter | -7 | 110 | ||
| Crossbowman | Good | Fighter | 0 | 110 | ||
| Crossbowman | Good | Fighter | -7 | 110 | ||
| Crossbowman | Good | Fighter | -7 | 110 | ||
| A Man Who Bows | ||||||
| Innkeyper | Good | Ninja | LO | 444 | Inn Key | |
| Temple Priests | ||||||
| Hear No | Good | Priest | -3 | 99 | ||
| See No | Good | Priest | -3 | 99 | ||
| Speak No | Good | Priest | -3 | 99 | ||
| Feel No | Good | Priest | -3 | 99 | ||
| Taste No | Good | Priest | -3 | 99 | ||
| Think a Little | Good | Bishop | -4 | 99 | ||
| A Living Legend | ||||||
| Hawkwind | Good | Ninja | VL | 1000 | (Can only be defeated by a Dink) | |
| Duke's Council | ||||||
| Duke Akbar | Good | Lord | -9 | 620 | ||
| Duke Seigfried | Good | Lord | -9 | 610 | ||
| Duke Cariadoc | Good | Lord | -9 | 600 | ||
| Duke Vissevald | Good | Lord | -8 | 600 | ||
| Duke Hasdrubal | Good | Lord | -8 | 570 | ||
| Duke Sigmund | Good | Lord | -9 | 570 | ||
Level XI - The Tree of Life
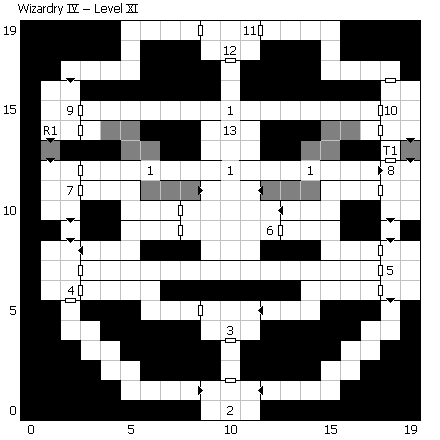
- These squares can only be passed through straight. (Eg, if you enter from the east, you can only leave to the east or west.)
- The answer to the riddle is "Foot". If you get it wrong, you are teleported to (9,10) on level 10.
- The answer to the riddle is "Stomach".
- The answer to the riddle is "Legs".
- The answer to the riddle is "Hips".
- The answer to the riddle is "Chest".
- The answer to the riddle is "Right Hand".
- The answer to the riddle is "Left Hand".
- The answer to the riddle is "Right Cheek".
- The answer to the riddle is "Left Cheek".
- The answer to the riddle is "Brain".
- The answer to the riddle is "Tree of Life".
- Get the Kris of Truth.
There are no encounters on this level.
Solution
↑ Back to TopLevel X: Start out by summoning some friends at the pentragram in your cell. You must summon some Lvl 1 Priests. Now, wander around your cell until you get an encounter and wait for your priests to cast milwa. Head out through the three guardians (you may need to wait for a combat if your milwa expires), tag the pentagram on the outside, head to the where the fourth guardian is. You might want to save first, but its better if you can get away with not saving.
Defeat the outer guardian, take the Black Candle, and equip it. Then wander the edge of the maze and get the Bloodstone. (If you had saved, you'd have to deal with lots of random encounters during this walk; by not saving, you avoid that to a large degree.) You can't equip the Bloodstone, so keep an eye on it. If a thief steals it, return to a savegame.
Go up the stairs and save.
Level IX: If you encounter Greyhawk's Ghostbusters on this level, just run from them. They're way out of your league at this point. You might have a chance if you've killed two or three of them individually before running into the group.
Tag the pentagram on the left. If you want, hit one of the Mess Halls at the end of the hall and get a Twilight Cloak. The Officers are fairly tough. If you win, return to the pentagram to recharge.
Head all the way around and get the Lander's Turq(uoise). Then, with a milwa spell going, head to the secret door and up the stairs.
You don't have all that is necessary right now to deal with the Gates of Hell yet.
Level VIII:Head towards the pentagram and get a new set of allies. Wander around next to the pentagram until you encounter both parties of adventurers here, then recharge at the pentagram again. At some point during this, your priests should have cast a maporfic spell. Once cast, this spell will last for the rest of the game.
Follow the path all of the way to the end, and defeat Glum to get the Black Box. The Black Box can hold up to 19 additional inventory items. Furthermore, things in the Black Box can't be stolen by thieves, and the Black Box itself can't be stolen so long as you have it equipped. Put the Black Candle, Bloodstone, and Lander's Turq in the box. In general, put anything important in the box.
Now, head up the stairs, tag the pentagram on level 7, then return back here. As you're doing this, stockpile Dios potions in the box. Save the game and defeat either Glum or Golem. I tend to find Golem a little easier, plus he has a Dios potion. Head around to (3,9), and save. You want encounters for this next bit, because your priests can heal you during combat.
Walk across the mines to get the Pyrite. Heal if you need to, and walk south to get the Amber Dragon. Heal again, walk west, then north to get out. Heal at the pentagram. Follow the path around to location 4 and get the Witching Rod. Then return to level 7 and save the game.
Level VII: Head through the darkness and to the pentagram. Summon at least one group of Level 5 Priests (as the Priestesses, in my experience, never cast lomilwa) and fight a battle so they can cast lomilwa. Recharge at the pentagram and switch back to Priestesses.
Watch out for the mages on this level as many of them can cast makatino, which will instantly kill you.
Head up the pyramid to the altar. Take the Bloodstone, Lander's Turq, and Amber Dragon out of the Black Box, invoke all three, and then use them on the altar. Take the Golden Sword: The Dragon's Claw gives you regeneration, which is more useful than the stoning or additional attacks that the other swords give you. If you want to switch swords, drop the sword you have and return to the altar; you will be given a choice of the three swords again.
Now head up the stairs and save.
Level VI: Navigating on this level is a pain. Stock up on Jeweled Amulets so you can conserve your dumapic spells. Combat is also a pain as the mages on this level can cast both makatino and tiltowait; either of which can kill you without a chance.
Make your way over to the pentagram on this level, cross over to the riddle room and get the Good Hope Cape and equip it. Then make your way down to where the Druid is hiding.
By this time, you should have encountered Gomez's group. Make sure you get the Digit from them and put it in the box. When you defeat Jesse, make sure to take both the Turban and the Diary and put both of them in the box. You'll need them later.
After defeating Jesse, you'll be teleported to the stairs leading upwards. Go up and save.
Level V: Lots of nasty creatures here. Fortunately, once you tag the pentagram here, you'll have access to the lakanito spell. Unfortunately, so do they, and in many combats, whomever casts their spell first, wins. This can be frustrating.
Start off by heading to the pentagram and recharging. Head south and a little east to one of the groups of L-5 Pioneers. Defeat them and take the Winged Boots. They'll be vitally important later. Recharge if necessary and pick your way across the map, avoiding the Light and Dark creatures when possible, collect the Oxygen Mask and head to the stairs. Along the way, you should run into the two groups of adventurers here. Get the Magician's Hat that Wincen has (of Horin's Holy Rollers) and wear it.
Nothing seemed to happen (at least for me) if you defeat one of each kind of Light and Dark creature. I don't think there is any significance to them (aside from getting the Winged Boots) except as an obstacle in your progress.
Head upstairs and save.
Level IV: You thought the previous two levels were bad for the eyes. This one is a pure nightmare. Given the difficulty mapping, especially the post-rotators, I'm not entirely certain the map is completely correct. It should be good enough to navigate through the level.
The state of each rotator is preserved continuously: reloading a gave, switching to a different save game, quitting the game and restarting, all do not affect the state of the rotators. Only leaving the level and returning will. Because of this, don't save the game on this level as you can get yourself into a configuration where you will have messed up not only this savegame, but all others you have as well.
Start by heading 2E, 2N, 1E, 2N, Camp (to allow rotator to exit north), 1N, 2W to the pentagram and summon some creatures. This will give you access to the malor spell, but it works differently in this game than in others. Where you are allowed to malor depends on how far you have progressed in the game. For now, you can only malor into levels 9 and 10.
Your two objectives on this level is to pool to turn you Neutral and getting an Aromatic Ball. The best route for both of these is to start by going 1W, 3N, 4E, 1N, 1E, 1N (witch is two more north of here -- stop in if you want), 1W, 3N, 13E (recharge at the pentagram here if necessary), 1N, 2E, 12N, 1W, 1N, 1W, 1S, 2W, 1S, 1W, 2N and get a Ball and put it in the box.
Then head 2S, 1E, 1S, 2E, 1S, 2E, 5S, 5E, 5N, 1E, 1N, 2E (this should fix the rotator), 1N, 1W, and 2S and wade in the pool.
Now, its time to return to finish some tasks on the lower level that you couldn't complete before. Malor to the stairs on level 9, and procede up to level 7.
Level VII: Head north to the edge of the ziggurat. Get out the Winged Boots, equip and invoke them, and fly up to get the Hopalong Carrot. Fly back down and go to location 5, save the game, and invoke the carrot. Fight the Dreamweaver, get the KA, and save.
Level IX: Head down to level 9; picking up another Black Candle from the guardian on level 10 if you need one, and visit the gates of hell. Fight the Hellhound to get the Demonic Chimes. Use the bell, book, and candle to open the gates, while you have the KA and the Winged Boots equipped, and get the Holy Hand Grenade. Put everything back in the box, and return to level 4.
Now, save your game and head up the stairs.
Level I: Welcome to the Cosmic Cube. The wandering monsters here are numerous, dangerous (loving to cast tiltowait and lakanito frequently), and often wander in packs rather than in isolation. And because you're switching levels so often, the defeated characters reset frequently. Because of this, the monster lists for these three levels are not as complete as for other levels. I'm not even certain I encountered all of the characters you can find due.
There are three things you need from the the parties in the Cube: Blade Cusinart', Holy Limp Wrist (4 of 5 endings only) and Pennonceaux. In addition, you need the Cleansing Oil and St. Trebor's Rump, both purchasable in the Cube.
You may start running out of room in the Black Box. Here are the items that you still need to finish the game: Aromatic Ball, Blade Cusinart', Golden Pyrite, HHG of Aunty Ock, Holy Limp Wrist, Magician's Hat, Pennonceaux, Witching Rod, and one of the swords from the Temple of the Dreampainter.
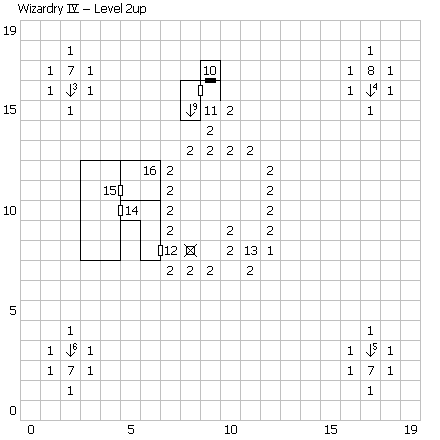
Here's one way to get through the maze. Its recommended that you save every time you switch levels. The coordinates at the start of every paragraph list the square you should be on at the start of that paragraph.
(15,11): 3N
Level III (19,15): 7W. The many signs pointing the way to the exit are rarely useful or accurate.
Level I (3,5): Head straight until you hit a wall. Then, cast a dumapic to determine which side of the room you're on, and follow the wall around to the north exit. Because of the numerous spinners, you really can't control your path here. If you "stumble" into a teleporter, it must have been the north teleporter, as you will always see the pentagram here before you can get to the south teleporter.
Level II (1,4): N, E, N, E, N, 2E into a teleporter to (3,11). The pits in this area do very minimal damage, so you shouldn't have to worry about them. Head 3N and buy the Cleansing Oil and put it in the box. Then head S, 3E and summon some creatures. Then 5E, 5S, W, and down the stairs.
Level III (10,9): 10W, 6N, 4E, 2N, 4E through an invisible door and into a teleporter. W and S into another teleporter. N, E into yet another teleporter. (You should be at (12,16) now.) E, N, W, N, 2E, N, E, S, E, N, E (forcing you to summon weak creatures), S, E, N, E, 2S, and up the stairs.
Level I (16,3): Now summon some real creatures. Demon lords and greater demons just rock. Head 3W, S into the darkness and buy the St. Trebor's Rump. Invoke it. Now Trebor's Ghost won't be chasing you around anymore. Put it in the box. Now go W, S, W, S, 4W, 2N, and E.
Level II (16,19): W, 16S (to the 2nd to last row of rooms), W, S and up the stairs.
Level I (0,7): N, E, N, E, N, E, N, E, S, 3E, N, E, S, E, S. One square to your west is another power pentagram if you need it. Down the stairs.
Level III (11,5): Follow the corridor all the way around. When it forks, take the west (right) branch.
Level I (3,0): Follow the corridor northeast to the stairs down.
Level III (3,8): West through the door, then follow the path around until you're back in a corridor again. Then 4S, E, 2N.
Level II (12,7): Use the walls to guide you. You can't use dumapic as when you leave camp mode, the spinners will just spin you again. Head 3W, 5S, and W.
Level I (18,14): Cast dumapic to make sure you got here instead of one of the adjacent teleporters. Save. Get out the Holy Hand Grenade, the Cleansing Oil. N, 3W. (Use the pentagram to the south if you need it.) Equip the Grenade and invoke it. Then equip everything and invoke the Cleansing Oil (this uncurses the HHG). Equip your ordinary equipment again. Drop the HHG. Leave camp, and head 3E, S until the HHG explodes. Return N, 3W and notice that the wall north has been destroyed. Head north and up the stairs.
Level IV:Now that you're on the surface, you can malor anywhere in the dungeon. Malor back to (5,13) on level 4.
Level IV: Walk north to talk to the Witch. She will take the six ingredients (Blade Cusinart', Magician's Hat, Aromatic Ball, Cleansing Oil, Golden Pyrite, and Witching Rod), even out of the Black Box, and give you the Dab of Puce. Put it in the Box.
Level I: Malor back to (15, 15) on level 1. If you haven't gotten the items from the wandering groups that you need, go down and get them now. Then head up to the outside world.
Level 0: You've escaped from the dungeon. You're in open air again. You've won, right? Well... not quite. In fact, here's where the game gets really hard -- although the difficulty is all in puzzles. Combat should be trivial the rest of the way out. Head into the castle and up the stairs in the northwest corner.
Level 1up: Follow the path around the battlements to the northeast tower. Head up the stairs.
Level 2up: Defeat the innkeeper here to get the Inn Key. Put it in the Box. Return back down to ground level.
Level 0: Head into the inn, and up the stairs.
Level 1up: Enter the rooms on both sides of the stairs here, and the south room next to the stairs to get the Maintenance Cap, Arrow of Truth, and the Orb of Dreams. Head back downstairs.
Level 0: Head to the east fountain. Wear the Maintenance Cap and repair the fountain. Bathe in the fountain to switch your alignment to Good. (If your alignment is still Evil, malor back down to level 4 to get it changed to Neutral.) Leave the castle and return to the dungeon.
Level I: Since all of your monsters left, summon some new ones at the pentagram. (You need them to fight the Walking Wounded entering/leaving the inn.) Then return to the castle.
Level 0:Return to the inn, and go up the stairs.
Level 1up: Head west and north and get the Crystal Rose. Now a lot of the guards in the castle will leave you alone. Return to the ground floor.
Level 0: Head to the donjon in the north-center of the castle grounds. Enter and meet with the Captain's Council. Pay them and get the Rallying Horn. Go up the stairs.
Level 1up: Talk to the Baron's Council and agree to sign and get the Singet Ring. Head up the stairs.
Ending #1
↑ Back to TopLevel 2up: Head outside and talk with the Duke's Council. Answer yes to both questions. You will become a benevolent overlord of the kingdom.
Other endings
↑ Back to TopLevel 2up: Head outside and enter the secret room to the north. Get the Mythril Glove. Head back down to ground level.
Level 0: Leave the castle and go back into the dungeon.
Level I: Summon from the pentagram here Greater Demons, a Demon Lord, and a Dink (from the first pentagram). Then return to the castle.
Level 0: Head into the inn, follow the corridor to the end, and push the button to go up a floor.
Level 1up: Head through the tavern, defeat the All-Stars, and push the button to go up a floor.
Level 2up: (This entire next section is required only for Ending #5. To complete the other endings, you can skip all the way until you are back at level 2up.) Head east (over the pit) and over to the pack-rat's stash. Search it to get the Void Transducer. Now malor back to (10,9) on level 10 (your original starting point).
Level X: Equip the Void Transucer and malor down 1. (You can only do that from here.)
Level XI: You enter the level at (10,0) always. Follow the path around, answering all of the riddles, until you get to the end. Get the Kris of Truth and equip it. Continue south from where you get the Kris until you're at (10,9) and malor up one level.
Level X: Malor back up to (0,0) on level 0. (Again, you can't malor directly there.)
Level 0: Head to the inn and head to the end of the corridor and push the button.
Level 1up: Head through the tavern, past the All-Stars again, and push the button.
Level 2up: Head through the temple and fight Hawkwind. The only thing that can harm Hawkwind is a Dink (which is why you have to have one in your monster party). (The oracle tells you Hawkwind has a weakness and that the answer is carved in stone. "Dink" is spelled out in the dungeon walls of levels 1 through 4.) Once Hawkwind has been defeated, enter the next room.
Equip the Mythril Gauntlet. (Otherwise, you'll go "poof" when you touch the Amulet in the endgame.) Make sure you have the Holy Limp Wrist in your inventory. (Otherwise, you won't be able to get the Amulet out of the God's hand.)
Ending #2
↑ Back to TopEquip the Dragon's Claw and approach the statue of Kadorto. You will become a god of destruction.
Ending #3
↑ Back to TopEquip the East Wind Sword (Green Sword) and approach the statue of Kadorto. You will become a god trapped in the large statue of Kadorto.
Ending #4
↑ Back to TopEquip the West Wind Sword (Blue Sword) and approach the statue of Kadorto. You will become a greedy and opulent god.
Ending #5
↑ Back to TopEquip the Kris of Truth and approach the statue of Kadorto. You achieve true enlightenment. This is the "true" victory in the game.
Oracle
↑ Back to TopThe Oracle randomly wanders around a level, and is visible as an "encounter" square on the ground. When you and the Oracle end your turns together in the same square, you get a chance to buy a clue from the Oracle for 2500 gold.
If you try to use the Mordorcharge card to buy a clue, you may end up being killed for it.
The clues that the Oracle hands out (in order) are:
- The Egress will set you free.
- Your future is black. You feel boxed in!
- Read the Iliad lately?
- Chomp, chomp,... eh, what's east, doc?
- Secrets abound all around you! Psst! Have you met Glum yet?
- Live the Qabalah!
- The answer is carved in stone. It is right before your nose!
- The temple holds an ancient secret.
- Hop high to enter.
- Rabbits are sacred to the Dreampainter.
- Seek the Dreampainter's soul.
- Everyone has a weakness! What is his?
- Take a step to the left and a hop to the right!
- Gone Trolling!
Item List
↑ Back to TopUnlike in the first three Wizardries, I was unable to locate the item list in the internal game tables. Hence, much of what is collected here is based off experimentation and guesswork. Also, some information available in previous games, like weapon damage, is unobtainable by experiementation.
Item: The name of the item, as it appears in your inventory.
Description: The description of the item, as it appears in the loot screen.
AC: The amount this changes your AC. Lower numbers are better.
Special: Other powers that the item has. Regeneration gives you that many hit points back each round of combat. Items marked "Use:" or "Invoke:" have a power that is activated when you use it or invoke it. Potions and Scrolls can be used once before being consumed. Most other items have a chance to be destroyed each time they're used.
| Item | Description | AC | Special | |
|---|---|---|---|---|
| Adept Baldness | Hair Remover | -8 | Cursed | |
| Amber Dragon | Stone | Used in the Dreampainter's Temple | ||
| Amulet of Badailma | Amulet | Can't Equip | ||
| Amulet of Makatino | Amulet | Use: Cast Makatino | ||
| Anointed Flail | Stick w/ Chain | Can't Equip | ||
| Anointed Mace | Knobbed Stick | Can't Equip | ||
| Arabic Dairy | Tale of Madness | Use: Cast Badi; Used at the Gates of Hell | ||
| Aromatic Ball | White Marble | Used by the Witch | ||
| Arrow of Truth | Gwilyin's Arrow | Use: Special Message; Used in the endgame | ||
| Bish's Toungue | Holy Reliquary | Use: Lorto | ||
| Black Box | Weighty Cube | Can hold up to 19 items. | ||
| Black Candle | Black Candle | Use: Cast Lomilwa; Used at the Gates of Hell | ||
| Blade Cusinart' | Sword | Can't Equip, Used by the Witch | ||
| Bloodstone | Stone | Used in the Dreampainter's Temple | ||
| Breast Plate | Armor | Can't Equip | ||
| Cape of Hide | Cape | -2 | Use: Cast Malor (once); Cast Dios (thereafter) | |
| Cape of Jackal | Use Me Cape | +4 | Cursed, Regen -5 | |
| Chain Mail | Armor | Can't Equip | ||
| Chain Mail+1 | Armor | Can't Equip | ||
| Chain Pro Ice | Armor | Can't Equip | ||
| Cleansing Oil | Oil of Ole' | Invoke to remove cursed items; Used by the Witch | ||
| Cone of Silence | Duncecap | -1 | Use: Cast Montino | |
| Copper Gloves | Gloves | Can't Equip | ||
| Chronicles of H | Use: Special Message | |||
| Crystal Rose | Glass Sculptor | Used in the endgame | ||
| Dab of Puce | Dark Glob | Used to get Arrow of Truth | ||
| Dagger | Dagger | |||
| Dagger+2 | Dagger | |||
| Dagger of Speed | Dagger | +3 | ||
| Darkness Cloak | Cloak | -1 | ||
| Demonic Chimes | Wired Bones | Use: Cast Mamorlis; Used at the Gates of Hell | ||
| Diadem of Malor | Diadem | -2 | Use: Cast Malor | |
| Dragon's Claw | Golden Sword | Regen +4 | ||
| Dragon Slayer | Sword | Can't Equip | ||
| Dreampainter KA | Feather | Use: Cast Madi; Used at the Gates of Hell | ||
| East Wind Sword | Green Sword | Petrifies | ||
| Entropy Cloak | Cloak | -4 | Regen -3 | |
| Get Out of Jail Free | Yellow Card | Use: Escape cages on level 4. | ||
| Golden Pyrite | Stone | Used by the Witch | ||
| Good Hope Cape | Cape | -3 | ||
| Helm | Helm | Can't Equip | ||
| Helm+1 | Helm | Can't Equip | ||
| HHG of Aunty Ock | Jeweled Fruit | Cursed, use to escape the maze | ||
| Holy Limp Wrist | Holy Reliquary | Use: Cast Dialko; Used in the endgame | ||
| Hopalong Carrot | Orange Rod | Use to reach Dreampainter | ||
| Initiate Turban | -1 | Use: Cast Halito | ||
| Inn Key | Key on Chain | Used to enter the inn | ||
| Jeweled Amulet | Amulet | Use: Cast Dumapic | ||
| Kris of Truth | Clear Light | Used in the endgame | ||
| Lander's Turq | Stone | Used in the Dreampainter's Temple | ||
| Large Shield | Shield | Can't Equip | ||
| Leather Armor | Armor | Can't Equip | ||
| Leather+1 | Armor | Can't Equip | ||
| Lich's Robes | Clothing | +4 | Cursed | |
| Longsword | Sword | Can't Equip | ||
| Longsword+1 | Sword | Can't Equip | ||
| Longsword+2 | Sword | Can't Equip | ||
| Lord's Garb | Armor | +10 | Cursed | |
| Mace+1 | Knobbed Stick | Can't Equip | ||
| Mace of Curing | Knobbed Stick | Can't Equip | ||
| Mage Masher | Sword | Cursed | ||
| Magician's Hat | Furred Cone | -2 | Use: Cast Sopic; Used by the Witch | |
| Maintenance Cap | Hat with Visor | 0 | Used to repair fountain | |
| MordorCharge | Charge Card | Pay oracle with instead of gold. Chance that you'll be killed. | ||
| Muramasa Blade | Weapon | Can't Equip | ||
| Mythril Glove | Shiny Gauntlet | 0 | Used to hold Amulet | |
| Night Cloak | Cloak | -2 | ||
| Novice's Cap | Beanie | -2 | Use: Cast Katino | |
| Orb of Dreams | Gold Ball | Use: Special Message; Used in the endgame | ||
| Oxygen Mask | Breath of Life | Invoke: Immunity to Makatino and Lakanito spells | ||
| P of Dial | P | Use: Cast Dial | ||
| P of Dios | P | Use: Cast Dios | ||
| P of Masopic | P | Use: Cast Masopic | ||
| P of Porfic | P | Use: Cast Porfic | ||
| P of Sopic | P | Use: Cast Sopic | ||
| Pennonceaux | Silk Cloth | Can't Equip | ||
| Plate Mail | Armor | Can't Equip | ||
| Plate Mail+1 | Armor | Can't Equip | ||
| Plate Mail+2 | Armor | Can't Equip | ||
| Rallying Horn | Horn | Used in the endgame | ||
| Ring of Death | Ring | Cursed, Regen -3 | ||
| Ring of Dispelling | Ring | ??? | ||
| Ring of Healing | Ring | Regen +1 | ||
| Ring of Porfic | Ring | Use: Cast Porfic | ||
| Robes | Clothing | -1 | ||
| Rod of Flame | Rod | Use: Cast Mahalito | ||
| S of Badial | S | Use: Cast Badial | ||
| S of Badios | S | Use: Cast Badios | ||
| S of Dilto | S | Use: Cast Dilto | ||
| S of Halito | S | Use: Cast Halito | ||
| S of Katino | S | Use: Cast Katino | ||
| Shadow Cloak | Cloak | -1 | ||
| Shield+1 | Shield | Can't Equip | ||
| Shortsword | Sword | Can't Equip | ||
| Shortsword+1 | Sword | Can't Equip | ||
| Shuriken | Weapon | Can't Equip | ||
| Signet Ring | Wax Seal | Used in the endgame | ||
| Silver Gloves | Gauntlets | Can't Equip | ||
| Skull's Cap | White Cap | +4 | Cursed | |
| Small Shield | Shield | Can't Equip | ||
| St. K.A.'s Foot | Holy Reliquary | Use: Cast Malikto | ||
| St. Rimbo Digit | Holy Reliquary | Use: Cast Tiltowait | ||
| St. Trebor Rump | Holy Reliquary | Invoke to remove St. Trebor's Curse | ||
| Staff | Stick | |||
| Staff+2 | Stick | |||
| Staff of Mogref | Staff | Use: Cast Mogref | ||
| Staff of Montino | Staff | Use: Cast Montino | ||
| Twilight Cloak | Cloak | -1 | ||
| Void Transducer | Nyin | Used to enter level XI | ||
| Were Slayer | Sword | Can't Equip | ||
| West Wind Sword | Blue Sword | Decapitates | ||
| Winged Boots | Molting Leather | Invoke: Lets you fly over mines and up the ziggurat. (If you invoke while not wearing, you lose them.) | ||
| Witching Rod | Stick | Use: Cast Kandi; Used by the Witch | ||
| Wizard Skullcap | Three Sided Cloth | -3 | Use: Cast Masopic |
Acknowledgement
Annotated by Mike Marcelais for the RPG Gamers archive.